Introduction
In my 40 years of performing breast reduction surgery, I have learned a lot. I hope that the information here will help other surgeons learn from my mistakes. Taking time to analyse pre- and postoperative photographs will help surgeons get better faster than I did.
I used an inverted T, inferior pedicle method for breast reduction during the first 10 years of my practice, starting in 1983. I was unhappy with some of the horizontal scars, and I remember sitting beside Madeleine Lejour1 at a conference in New Orleans. She encouraged me to try her vertical approach, and I have been grateful to her ever since.
1. Blood supply and the true superomedial pedicle
I started with Lejour’s superior pedicle, vertical approach, but I had trouble insetting the pedicle without compression. I mistakenly thought that I needed to keep the pedicle full thickness to preserve blood supply. The opposite is the case: the blood supply is superficial and the full thickness dermoglandular pedicle could instead compress the blood supply. I then tried a lateral pedicle under the misguided assumption that it would provide better sensation. I was using both medial and lateral pedicles (Skoog,2 Strombeck,3 Orlando and Guthrie,4 Asplund and Davies5) and I found that the medial pedicle not only had better sensation than either the lateral or superior pedicles, but I could control the horizontal base diameter and also achieve better aesthetic results by being able to remove the excess lateral fullness.
After Ian Taylor6 casually mentioned to me that the blood supply to the breast was superficial, I started paying more attention to the vessels encountered during surgery (Figure 1). I was wasting the strong blood supply from the descending artery from the second interspace, and I started using a true superomedial pedicle which has a dual axial blood supply. It means carrying the base of the pedicle lateral to the breast meridian, but this also means that the pedicle often needs to be thinned for an easier and safer inset. I spent some time doing fresh injected cadaver dissections with Peter Palhazi who was a resident at the time in Budapest, and it was clear that the blood supply to the superiorly based pedicles was superficial and did not come directly from the chest wall except peripherally. The only deep artery (and vena comitans) that supplies the nipple comes up from the fourth interspace above the fifth rib just medial to the breast meridian (there are some lateral branches in what is called Würinger’s septum7).
I lost a superior pedicle because I compressed it with a full thickness inset. I then tried a lateral pedicle because I thought it would have better sensation and I thought that rotating it around into place would reduce the lateral breast fullness (Figure 2). Unfortunately, neither were true.
I found that 85 per cent of patients with a medial pedicle recovered normal to near-normal sensation whereas the superior pedicles were only 67 per cent and the lateral pedicles 76 per cent (Table 1). These were assessed by pre- and postoperative patient-reported questionnaires using a Likert scale.
As far as circulation is concerned, I also used a pencil Doppler in 85 patients and realised that the reason that I also lost a lateral pedicle was because the blood supply from the superficial branch of the lateral thoracic artery is often too low for a lateral pedicle. Unfortunately, I have also had nipple necrosis in medial pedicles, but only one partial necrosis in a true superomedial pedicle. I see many papers using the word ‘superomedial’ when the base of the pedicle may look superomedial when the patient is standing, but the blood supply is only medial (Figure 3). I remember sitting at an outdoor café in Melbourne with both Ian Taylor and Alaa Gheita when I had the privilege of talking blood supply with both these plastic surgery pioneers. Gheita (Egypt) has shown how the blood supply to a very long superiorly based pedicle is both safe and powerful.8
2. Vertical wedge resection
It took me a while to understand the power of the vertical wedge resection of ptotic breast tissue. With an inferior pedicle, we are removing a ‘horizontal’ ellipse of skin and breast tissue and ending up with a medial and lateral dog-ear. With removal of a ‘vertical’ ellipse of skin and breast tissue, we end up with a superior and inferior dog-ear. Of course, the superior dog-ear is not a problem, but the inferior dog-ear may not settle on its own. In the past, I told my inferior pedicle patients that the medial and lateral dog-ears could not be easily corrected, but of course the inferior dog-ear is much easier to correct with the vertical elliptical wedge resection (which leads to a higher revision rate of course).
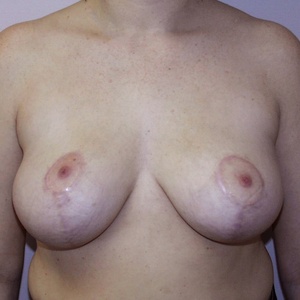
The advantage of the vertical approach is in control of the horizontal base diameter. One of the downsides with an inferior pedicle is that sometimes the result would have a ‘boxy’ shape. That is not an issue with the vertical approach (Figure 4).
3. Remove the excess where it is
One of my initial problems using the vertical approach for breast reductions was under-resection. The breast often looks smaller on the table than it did with an inferior pedicle, and I often left the breasts too large. This ended with too much inferior breast left behind. Several surgeons criticised the vertical approach because of ‘bottoming-out’ but I think instead that it was under-resection. It was my fault—and not the fault of the procedure. Once I realised that I needed to remove more breast tissue, I was able to avoid this problem (most of the time).
The reason that the breast looks smaller on the table with the vertical approach as opposed to the inferior pedicle, inverted T approach is because of the increased projection that results from the vertical wedge resection. But the problem was where to remove the extra breast tissue?
I learned to remove that extra breast tissue from under the lateral flap while still leaving at least a 2 cm thick lateral pillar (Figure 5 and Figure 6). When I stood back to analyse the breasts preoperatively, it was clear that the excess breast tissue was both inferior and lateral. I learned to evaluate the preoperative breasts by marking where the excess is—and then removing it. The bulk of a laterally based pedicle would slide back laterally and of course it is more difficult to remove the lateral excess while using a lateral pedicle because that excess tissue forms the base of the lateral pedicle.
This lateral excess can be removed either directly or combined with liposuction. Direct excision is necessary in teenagers (and more time-consuming). Liposuction will not work on glandular breast tissue and that lateral excess needs to be carefully carved out.
4. The Wise pattern
I finally came to understand the value of the Wise pattern (Figure 7). Robert Wise deconstructed a brassiere and in 1956 described the pattern that we use for an inverted T skin resection.9 It is a great pattern, but skin is not a particularly good brassiere because it stretches under tension (weight).
I learned that a skin-only mastopexy (even with overlapping dermal flaps) was doomed to failure over time. Skin is composed of epidermis and dermis, and dermis stretches whenever tension is applied (eg, skin expansion). The glandular ptosis that is ‘removed’ in a breast reduction needs to be ‘moved’ in a mastopexy (Figure 8). What we should be leaving behind in any breast procedure is a Wise pattern of parenchyma—not skin. Once the parenchyma is rearranged and the various flaps are healed to each other, the skin is not acting as a brassiere, it is just adapted to fit the final breast shape.
5. There should be no tension on the skin closure
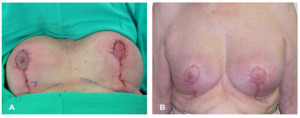
This then led me to understand that one of the earlier criticisms of the vertical approach was that wound healing problems occurred more often than with an inverted T approach. This was because I was still using a tight skin closure just as I had with my inverted T, inferior pedicle breast reductions. I was also constricting the blood supply to the skin edges by gathering or cinching the vertical closure. But it became clear that the skin was not holding up the breast and that a loose closure was a better approach because there were fewer wound healing issues. Tension on the skin closure is a problem—and not a solution (Figure 9).
6. Do not cinch or gather the vertical incision
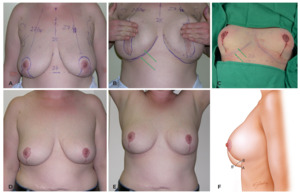
This then led me to understand that cinching or gathering the vertical incision also led to wound healing problems because the blood supply to the skin edges was being constricted (Figure 10). I measured the vertical incision preoperatively, before closure, after closure and at each follow-up visit. Not only did the vertical incision stretch back out, but if it didn’t, it left pleats that needed to be revised later.11
7. The vertical incision should not be shortened
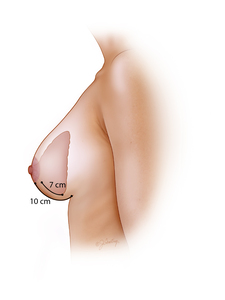
I then realised that not only did cinching up the vertical incision not work,11 but the vertical length was instead needed for the increased projection which resulted. The skin closure on the inferior pedicle, inverted T procedure was kept at 5–7 cm because surgeons knew that the skin would stretch out because of the tension on the repair. But if you look at attractive breasts, the distance from the bottom of the areola to the inframammary fold (IMF) is often well over 7 cm. We had spent so long trying to control the stretching of the vertical skin component of an inverted T, inferior pedicle breast reduction that we did not recognise that we were often flattening and compressing the breast instead.
Once I realised that the vertical incision did not need to be cinched, I realised that the breast did not need to be concave inferiorly. The inferior border of the medial pedicle becomes the medial pillar and this ends up leaving an elegant curve to the lower pole of the breast on the table and immediately postoperatively (Figure 11).
8. The inframammary fold is not a good landmark
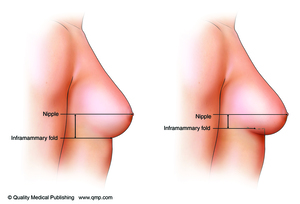
I began to realise that the IMF is not a good landmark especially when talking about the ideal length of the vertical incision (Figure 12). Some patients have a high IMF level (with a longer vertical distance) and some have a lower IMF level (with a shorter vertical distance). When someone has a high IMF, there will be more breast overhang (more ‘pencil-holding’ ability) than someone with a lower IMF.
9. The breast footprint and the upper breast border
As I switched from slides to digital photos, I spent more time analysing my results. It was much harder to review before and after results with slides, whereas doing layouts with digital photos made things much clearer. One ‘light-bulb’ moment came when I realised that patients did not have the same breast footprint.12 There were considerable variations in the attachment of the breast to the chest wall. Some patients had a very low footprint and some very high. Some patients had a very narrow vertical footprint and some had a very low IMF with a long vertical footprint.
What became clear was that the upper breast border did not change in a breast reduction postoperatively from where it was preoperatively.13,14 Scott Spear and I both agreed that the upper breast border, although less distinct than the IMF, was actually a better landmark for determining new nipple position as well as breast shape (Figure 13). The upper breast border curves upward from the indentation between the pre-axillary fold and the lateral breast.
10. New nipple position
I still hear surgeons say that the nipple should be about 21 cm from the suprasternal notch. This does not take into account that the breast footprint can only be minimally altered. That measurement will need to be much longer in a patient with a low footprint (Figure 14).
The IMF is often used to determine nipple position as a basis for Pitanguy’s point. But if you watch experienced surgeons, they might put one finger in the IMF, but they adjust the finger on the other hand moving up and down the breast surface because of what they can see in their mind’s eye—through experience. The IMF can be very misleading as a landmark, especially for residents. The ideal nipple position will depend on the proportions of the patient as well as the desired final size (Figure 15). A particular cup size is not an actual volume, but it is based on a patient’s proportions.
A nipple position that is higher on the breast mound (45:55) may look good naked, but it doesn’t do well in clothes—especially in bathing suits and low-cut evening gowns. It is better to design a nipple position which is 55:45 or slightly below the horizontal breast meridian. This is a safer position because it is relatively easy to elevate a low nipple but almost impossible to lower a nipple which is too high. We also know that breasts can bottom-out over time with aging, weight changes and pregnancy. The increased glandular ptosis does not always pull down the nipple at the same time.
11. The inframammary fold changes with weight
It became evident to me that the IMF would rise after a vertical breast reduction. This meant that the vertical incision should be kept well above the IMF so that it did not end up below the breast on the chest wall. The other reason that the incision should be kept well above the fold is because the closure of an ellipse will push the ends away from each other. I usually place the bottom of the vertical incision about 4 cm above the IMF (or about 6 cm if I am trying to elevate the IMF even more).
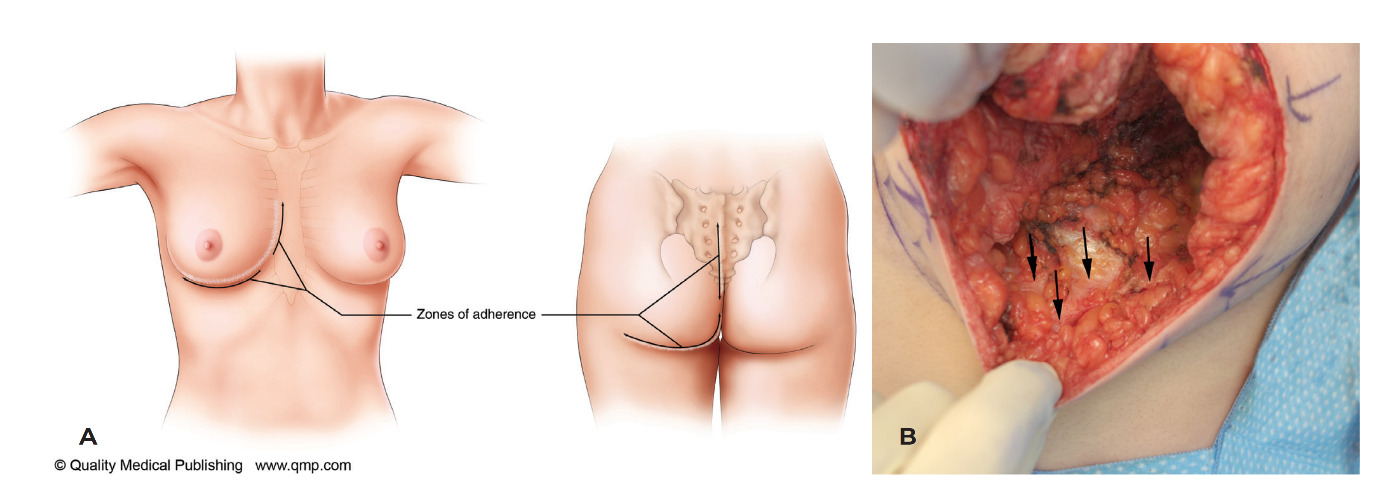
The IMF is not a ligament but a zone of adherence with skin-fascial fibres holding it in place (Figure 16). It extends vertically for a few centimetres. During surgery, you can tether the IMF by pulling on criss-crossing white fibres with forceps. When a patient lies down, the IMF rises. When weight is added (an implant), the IMF drops. When weight is removed (superiorly based breast reduction), the IMF rises. Gil Gradinger often challenged me as to why anyone would want their IMF raised. I would actually point out that it would rise inadvertently, but that sometimes patients actually liked being able to wear their brassiere or bathing suit band higher up on their chest wall. On the other hand, some patients did not like the breast overhang with a high IMF (pencil-holding ability). It is of course important to manage patient expectations by helping them understand these issues.
12. Weight and gravity
Understanding how weight and gravity affected the level of the IMF helped me understand better how to approach breast re-reduction.15 Although I had noticed that the IMF would often rise after a superiorly based vertical breast reduction, it also became clear that many patients who had previous inferior pedicle, inverted T breast reductions ended up with bottomed-out IMFs—well below the original horizontal scar. Many surgeons are worried about the previous pedicle in a breast re-reduction, but often the nipple does not need to be elevated to any significant degree and it can easily survive on a random pattern blood supply. It is difficult (and unnecessary) to recreate an old pedicle and a new pedicle with its axial vessels is no longer available because these vessels were cut during the original reduction. It is important to remove the excess (and the weight) where it is—and this usually means removing the inferior breast tissue and the previous inferior pedicle. The IMF will rise back up into the horizontal scar (without sutures) just by removing the weight—by either direct excision and/or liposuction between the bottomed-out IMF and the previous horizontal scar.
A horizontal ellipse of skin should not be removed. The excision will just pull down the IMF. Instead, the skin between the original horizontal scar and the bottomed-out IMF should be unweighted, allowing the skin to revert back to the chest wall (without sutures). A re-reduction can often be performed without reopening the inframammary scar (Figure 17).
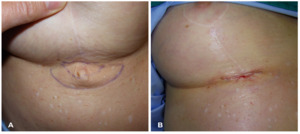
This new IMF level does not need to be sutured—it will find its own place with just the weight removed (when an implant is added, sutures are then needed to counteract the added weight). The IMF should be allowed to float freely when weight is removed. Some surgeons, for example, will suture down the inferior pucker, but that can lead to scar contracture (see Figure 35A).
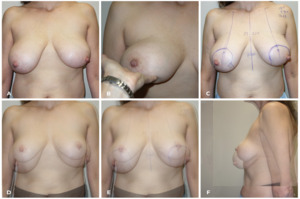
The more that I thought about gravity and breasts, the more I looked back at results that I had achieved in breast reduction that relied solely on removing weight (Figure 18). I would occasionally use liposuction-only breast reductions16 (where the patient had a good breast shape and a mainly fatty breast) and there were a few where I used the method described by Niamh Corduff and Ian Taylor,17 which involved glandular resection only with no skin removed (Figure 19).
13. Adding an inverted T to the skin resection pattern
At first, I believed that all breast reductions could be managed with only a vertical approach without adding an inverted T. It is surprising how many patients do not need an added T, but occasionally there will be too much redundant skin (especially if it is of poor quality) and it needs to be resected (Figure 20). This skin can be removed at the time of surgery, but the incision must be curved up slightly. Deciding when to add a T can be determined by pushing the breast caudally while at the same time lifting the breast off the chest wall (Figure 21). If the pucker tucks in with this manoeuvre, it does not need to be excised. Patients need to be warned about the pucker—a preoperatively informed patient can be your best ally.
14. Markings
-
Mark the upper breast border (at the junction between the pre-axillary fold and the breast). Do not push the breast up but fold it up and the upper breast border may become more obvious.
-
Mark the chest midline and note any asymmetries.
-
Mark each breast meridian where it should be—not necessarily where it is (Figure 22 and Figure 23).
-
Mark the new nipple position about 8–10 cm below the upper breast border. Ignore the IMF.
-
Mark the new nipple position lower on the larger breast to accommodate the closure of a wider ellipse.
-
Mark the top of the areola about 2 cm above the new nipple position.
-
Mark the areolar opening so that it ends up as a circle. It does not need to be ‘mosque’ shaped, but it should be about 14–16 cm long to accommodate a 4.5–5 cm diameter areola.
-
If an areola is too lateral, keep the medial markings the same with respect to the breast meridian, but you may need to angle out the vertical limb more laterally. Do not move the medial areola marking laterally. The lateral areolar opening can be moved laterally to go around the existing areola because there is much more mobility of the lateral breast than there is of the medial breast.
-
Mark the vertical elliptical excision as a ‘V’ but keep it about 4 cm above the IMF. (I originally described this excision as a ‘U’ but only because I was trying to encourage surgeons to remove enough subcutaneous tissue inferiorly.)
-
Rotate the breast medially and laterally to check the vertical limb positions and then pinch them together to make sure that you are not taking too much skin. Remember that this is not a skin brassiere operation.
-
Design the base of the nipple pedicle so that it is about 4 cm below the areolar opening. The inferior border of the medial pedicle becomes the medial pillar, and this gives an elegant curve to the lower pole of the breast.
-
Mark the upper base of the pedicle to extend just lateral to the breast meridian so that the descending artery from the second interspace is included. (A pencil Doppler can be used.)
-
If the IMF is at different levels, you may want to excise more tissue above the IMF on the lower side.
15. Procedural steps
-
I only infiltrate the parts of the breast where liposuction will be performed. Infiltrating the skin incision lines just leads to small haematomas.
-
Incise the edges of the areolar opening and the vertical limbs.
-
Place a lap pad around the base of the breast and hold it with a Kocher clamp.
-
Cut around the areola after marking it with a cookie cutter. The size of the cookie cutter does not matter much—the areolar skin will stretch to fit the skin opening.
-
I usually de-epithelialise with a 15 blade in strips. It just makes it faster (and this is much easier than de-epithelialising an inferior pedicle).
-
Remove the lap pad and excise an inferior wedge of breast tissue using cutting cautery or a knife. Leave at least a 2 cm thick lateral pillar.
-
You will notice that the veins are just under the dermis and the arteries are about 1–2 cm deep to the skin surface. You may encounter the deep artery and vein that comes up just above the fifth rib and just medial to breast meridian. There will also be some lateral branches. It is important to note where bleeding occurs and cauterise it carefully so that you can help avoid a later haematoma.
-
Try not to damage the pectoralis fascia so that you can avoid scar contractures.
-
Excise any glandular breast tissue from under the lateral breast flap while maintaining a good lateral pillar. This is often done piecemeal until a good final Wise pattern is achieved. I like to use long monopolar forceps (the ones without a foot switch) to achieve haemostasis in this area.
-
Put your first suture into the base of the areolar opening. This will help you decide if more breast tissue needs to be removed and where it needs to be removed. You want to leave a Wise pattern of parenchyma behind with about a 7 cm long pillar. Tissue inferior to the Wise pattern should be directly removed if it is ‘white’ and otherwise it can be removed later with liposuction. The ‘ghost’ areas below the Wise pattern should be directly excised (thank you Carolyn Kerrigan). Make sure that a good layer of fat is left on the dermis—otherwise scar contractures will develop.
-
Pull up the pedicle. If it does not inset easily, debulk it. Remember that there is no blood supply to the nipple through the parenchyma in the superomedial pedicle. If debulking is not adequate, then back-cut the inferomedial portion of the pedicle. The main blood supply is not medial but from the descending artery from the second interspace. Do not back-cut superolaterally.
-
Pulling up the pedicle with forceps will then allow the pillars to fall together. If you do not do this, you might end up suturing the middle of the medial pillar to the lower aspect of the lateral pillar and this might leave a bulge of breast tissue medially.
-
Suture the pillars while holding the pedicle up. You don’t need really deep sutures unless the posterior surface of the pillars has a gap. It is important to suture ‘white stuff to white stuff’ (thank you Bill Little). Fat does not heal well to fat. You do not need a lot of sutures—just enough that will hold the pillars together long enough that they heal together. I usually use 3-0 Monocryl.
-
Close the deep dermis with interrupted 3-0 Monocryl Plus sutures with about 4 around the areola. Some trimming of skin around the areolar opening may be needed so that it ends up as a circle. The ‘Plus’ sutures have triclosan embedded in them (an antibacterial, not an antibiotic) and I believe this helps prevent suture spitting. The vertical incision is similarly closed.
-
Then you can decide what areas will require liposuction for tailoring out any excess fat—usually along the IMF, in the lateral chest wall area and in the pre-axillary fold. Make sure that you leave fat on the dermis—otherwise you will get scar contractures that are hard to correct.
-
I do not use drains. Seromas can occur especially under the lateral flap, but they almost always settle on their own.
-
I cover the incisions lengthwise with paper tape (3M Micropore has the best adhesive) and I leave it in place without changing it for 3–4 weeks. I do not tape the breast itself. Patients can shower the next day and pat the tape dry.
-
I use a soft surgical brassiere with a wide inferior band and with a zipper in the front and adjustable clips in the back. The brassiere is not for compression but just for support. Although lateral compression might help the liposuction areas, I do not want too much compression on the nipple pedicle. Patients usually wear this brassiere for a couple of weeks, day and night, and then they can change into anything they want.
-
There will be significant bruising from the liposuction and patients need to be aware that those areas may be indurated for several weeks.
-
Patients may have hypersensitivity in the nipples, and I encourage them to press on them initially and rub them later on to desensitise them. It can take a bit longer for good sensation to return than it did with my inferior pedicles, but the final results are about the same: 85 per cent of patients recover normal to near normal sensation.
16. Complications
Potential complications are a normal part of performing surgery. A good preoperative assessment is essential. When we discuss breast reduction surgery with patients, we should differentiate between expected issues and potential complications. The early issues such as pain, swelling, bruising and nipple hypersensitivity should be discussed. Later issues such as scarring, asymmetry, loss of sensation, potential inability to breastfeed, and changes in shape over time are to be expected. A certain percentage of revisions will be necessary (and of course the rate will depend on the surgeon’s threshold for revision). Patients also need to understand that sometimes complications can also occur. Surgery is safe, but it is not risk free.
Haematoma
Patients need to be asked about over-the-counter medications (NSAIDs) and any herbs and supplements that they might be taking. We ask them to stop at least two weeks before and after surgery.
Haematoma formation is most likely in the first day or so after surgery (Figure 26), but I have also seen it over six weeks later when patients participate in excessive physical activities. Common sense is not always common.
Seroma
Seromas will occur especially when there is some friction. Fortunately, most of the seromas that occur with a vertical breast reduction are under the lateral flap and they will settle on their own. Drains will not prevent a seroma from forming; they just treat them—but only if they are left in for more than a few days. Aspiration of a seroma is rarely needed in vertical breast reduction surgery. Difficult seromas are more likely in inverted T breast reductions because the fluid is blocked from being absorbed in the surrounding tissues by the incisions.
Infection
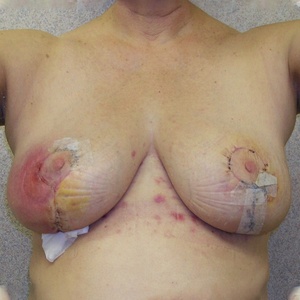
I did not use antibiotics at all when I was first in practice and of course infections did occasionally occur (Figure 27). When I started using the vertical breast reduction approach that cinched up the vertical incision, I had wound healing problems with sutures festering and spitting. I finally threw up my hands and put all patients on a week of cephalexin. The improvement was dramatic but eventually we were of course told that we could only use one preoperative dose of antibiotics, usually cefazolin. Some suture spitting still occurred and I started using the ‘Plus’ sutures that contain triclosan (an antibacterial, not an antibiotic). That helped.
But probably the best thing that I did was avoid all tension on the skin repair. Cinching or gathering of the vertical incision just compromised blood supply and it didn’t help shorten the vertical scar. The whole approach to breast reduction became a parenchymal reshaping procedure rather than a skin brassiere operation.
Breast reduction surgery which involves cutting through breast parenchyma and breast ducts should probably not be classified as ‘clean’ surgery but instead classified as ‘clean contaminated’. We all know that bacteria colonise the breast ducts.
Fat necrosis
Fat necrosis will usually settle on its own. I experienced an occasional hard lump at the distal end of the pedicle until I started using a true superomedial pedicle. Rarely a small lump will form in the incision line over time, but I suspect that most of these are buried skin cells that keep growing rather than true fat necrosis. I always encourage patients to come back and see me for an assessment of issues like this rather than having someone send them for a mammogram (I usually tell patients to wait at least six months before their next mammogram and I warn them that they might be called back for more views because their first mammogram after a breast reduction will serve as their new baseline for future comparisons).
Dehiscence
Occasionally, wound dehiscence occurs (Figure 28). I usually just tell the patient that it is a bad idea to resuture the area because it is more likely to get infected. I warn them that the dehisced area may get larger before it starts to close. They can either keep it dry or keep it moist depending on personal preference. Healing by secondary intention can be quite powerful.
Nipple necrosis
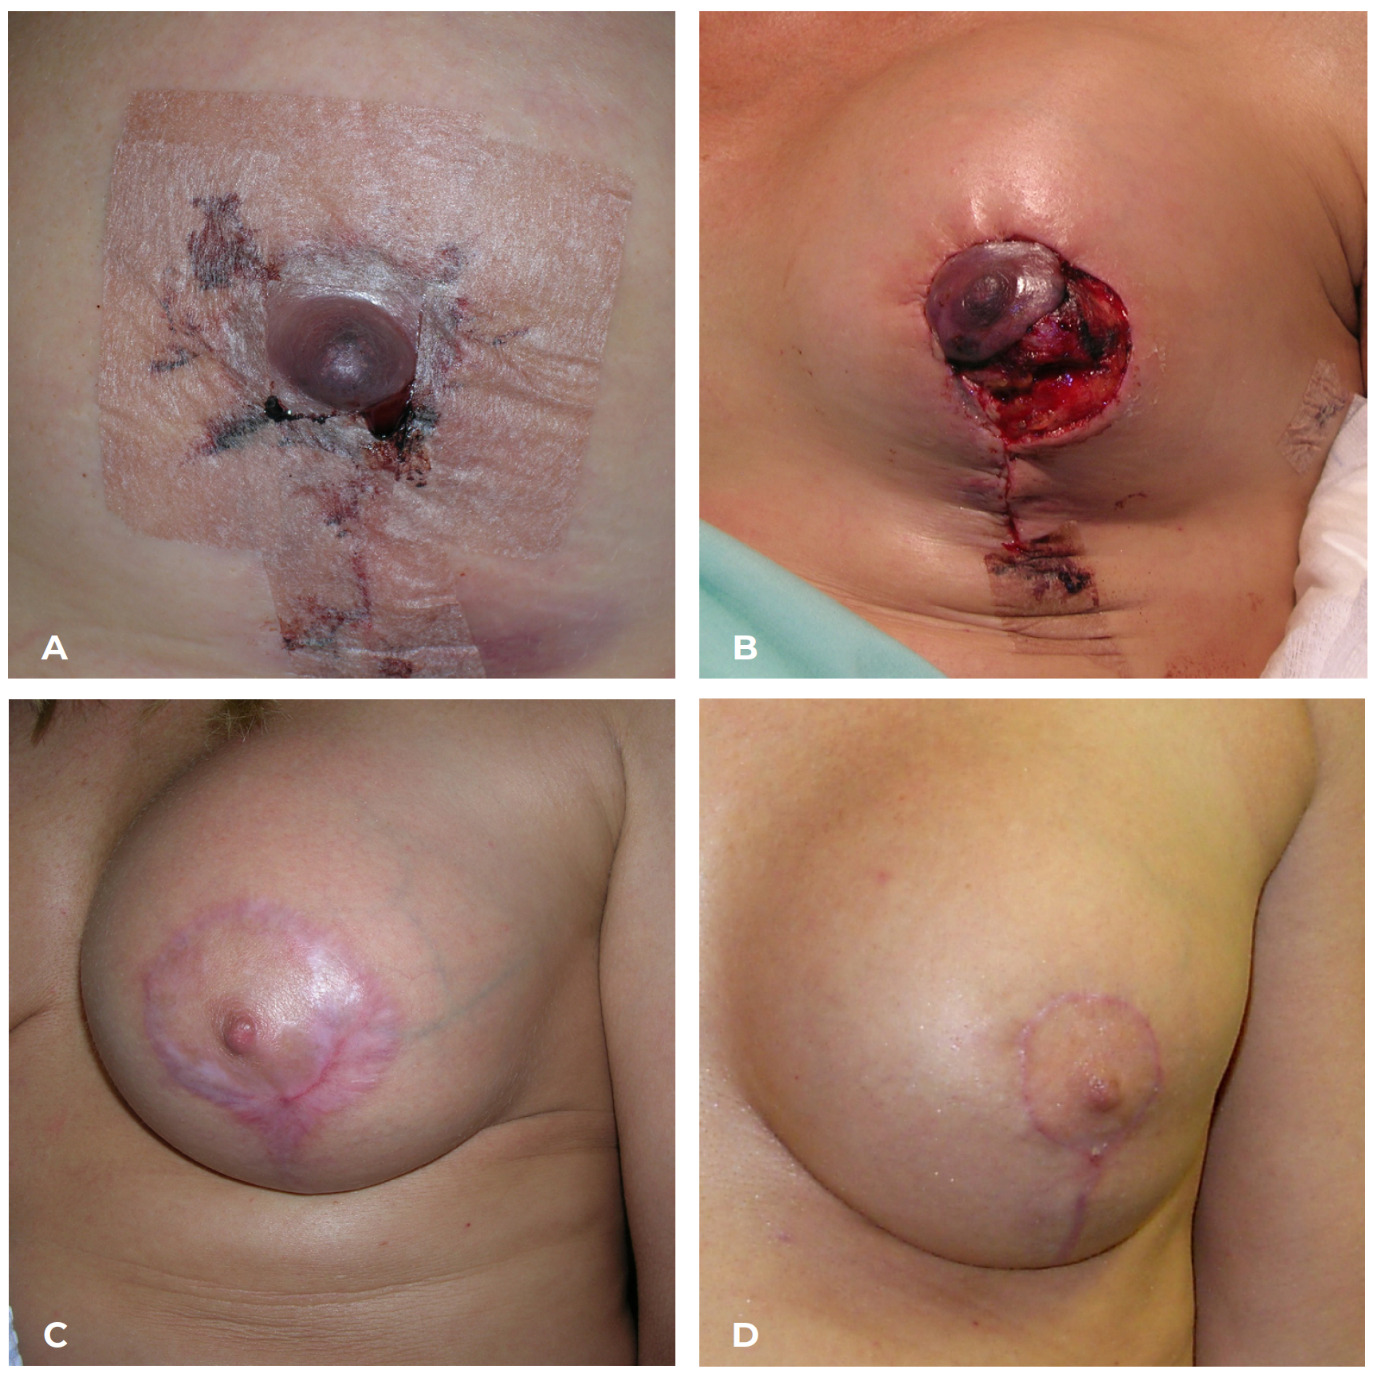
Of course any compression on the nipple should be relieved either intraoperatively or postoperatively. Venous congestion usually appears swollen with purple discolouration, and it should be relieved by releasing sutures or taking the patient back to the operating room (Figure 29). Arterial deficiency usually presents as a pale dusky areola. That is when the diagnosis is difficult.
I would argue with the classic recommendation to convert a dusky or potentially compromised nipple to a free nipple graft. There are consequences of action just as there are consequences of inaction. The nipple areolar complex is very privileged when it comes to vascular compromise. The example in Figure 30 shows that a free nipple graft would not have been a good idea. The example in Figure 31 shows that once nipple necrosis is established, watchful waiting is the best approach until the necrosis has fully declared itself.
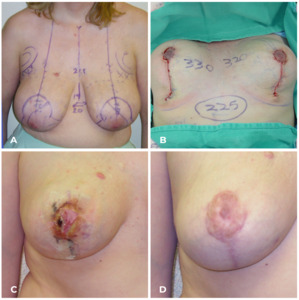
Apart from adding antibiotics to prevent bacteria from benefitting from poor blood supply, I believe that watchful waiting will often give the best result. It may be tempting to debride what looks to be necrotic, but recovery can be surprisingly dramatic (Figure 32). The hardest part is dealing with patients’ demands to do something.
Puckers
Puckers can take some time to settle. I warn patients that, because of gravity, swelling settles in the lower portion of the breast. The swelling and the pucker at the lower end of the vertical incision (or the puckers at either end of a horizontal incision) can take weeks and months to settle. The final result may not be evident for a full year. If a pucker persists, it can be easily corrected under local anaesthesia in the office.
If a pucker sits above the IMF, it can be corrected with a vertical elliptical excision at the lower end of the vertical scar along with a horizontal excision of fat (Figure 33). Most puckers are more of a problem of excess subcutaneous tissue rather than excess skin.
If a pucker sits below the IMF, then a small horizontal elliptical excision of skin and a wider elliptical excision of fat can be performed (Figure 34).
Scar contracture
Scar contracture will result when there is no intervening fat. This can occur in the breast itself if the pectoralis fascia has been denuded. Sometimes the breast will scar down to the muscle. This can result in an animation deformity when the muscle contracts (and this is why any attempt to suture breast tissue to the pectoralis fascia will only work—unfortunately—if scar contracture is the result).
When the surgeon is removing breast parenchyma and fat from the ghost areas caudal to the Wise pattern, care must be taken to make sure that adequate fat is left on the dermis to prevent scar contracture (Figure 35).
Acknowledgements
All artwork and photographic images taken from Hall-Findlay EJ. Aesthetic Breast Surgery: Concepts and Techniques. St Louis: Quality Medical Publishing, 2011. Images used with permission.
Patient consent
Patients/guardians have given informed consent to the publication of images and/or data.
Conflict of interest
The author has no conflicts of interest to disclose.
Funding declaration
The author received no financial support for the research, authorship and/or publication of this article.
Supplementary online material
A video accompanying this guide can be found on the AJOPS YouTube channel: https://youtu.be/DZAhXFN8P4g. Please note that due to YouTube content restrictions, you may be required to sign in or create a login to access the video.
_the_only_blood_supply_that_travels_through.png)
_the_true_superomedial_pedicle_is_not_a_medial_pedicle._the_true_superomedial_pedicle_has_.png)

_it_is_better_for_long-lasting_results_to_remove_the_unwanted_inferior_breast_tissue_and_l.png)
_frontal_views_of_patient_before_and_over_one_year_after_a_medial_pedicle_vertical_breas.png)
_the_wise_pattern_is_normally_used_for_the_skin_resection_pattern__but_it_is_instead_goo.png)

_tension_on_the_skin_led_to_wound_healing_problems._(b)_th.png)
_i_performed_numerous_measurements_that_show_that_cinching_up_the_vertical_incision_not.png)



_this_17-year-old_patient_is_shown_before_and_after_a_breast_reduction_(corduff_and_ta.png)


_note_that_the_new_nipple_position_is_ma.png)
._a_superomedial_pedicle_is_incised_and_carr.png)


_wound_separation_in_the_early_postoperative_period._the_area_was_left_open_(resuturing_w.png)



_this_is_a_surgical_scar_contracture_that_occurred_when_the_pucker_was_sutured_down_to_th.png)
_the_only_blood_supply_that_travels_through.png)

_the_true_superomedial_pedicle_is_not_a_medial_pedicle._the_true_superomedial_pedicle_has_.png)

_it_is_better_for_long-lasting_results_to_remove_the_unwanted_inferior_breast_tissue_and_l.png)
_frontal_views_of_patient_before_and_over_one_year_after_a_medial_pedicle_vertical_breas.png)
_the_wise_pattern_is_normally_used_for_the_skin_resection_pattern__but_it_is_instead_goo.png)

_tension_on_the_skin_led_to_wound_healing_problems._(b)_th.png)
_i_performed_numerous_measurements_that_show_that_cinching_up_the_vertical_incision_not.png)




_this_17-year-old_patient_is_shown_before_and_after_a_breast_reduction_(corduff_and_ta.png)


_note_that_the_new_nipple_position_is_ma.png)
._a_superomedial_pedicle_is_incised_and_carr.png)


_wound_separation_in_the_early_postoperative_period._the_area_was_left_open_(resuturing_w.png)


_this_is_a_surgical_scar_contracture_that_occurred_when_the_pucker_was_sutured_down_to_th.png)