


Introduction
The purpose of most clinical photography in aesthetic or cosmetic facial procedures is to communicate the result of an intervention without photographic bias. The disciplines involved are to take an excellent photograph and to take another perfectly matched photograph at a later time. The main change communicated should be the result of the surgical (or non-surgical) intervention. The purpose of this paper is to share a novel system which we believe can give the best possible chance of taking high quality, correctly matched photographs.
We will concentrate on the four areas necessary to achieve this: depth of field, exposure, perspective, and point of view. The first three can be set, while point of view needs the photographer’s input and requires practice and understanding. We will discuss the setup needed to achieve photographic consistency and establish baseline equipment requirements. We will also discuss some technical formulae.
No matter how closely shot two photographs are, even in identical conditions, there will always be small differences. However, if the two photographs are truly shot using the parameters as explained here, it should be possible to match the photographs very closely. These objective standards will give photographs of the highest quality for medical records, patient education, before and after comparisons, medical education and presentation, and build trust in external marketing on websites, social media and subscription platforms.
All the variables described below are predicated on the use of a digital single lens reflex (DSLR) or mirrorless camera with manual programmable settings. This is a technological standard that is beyond that of smart phones, tablets and more basic cameras.
This paper is on photography of the face, but the principles can be extrapolated to photography of the body. We will not be discussing three-dimensional photography here.
Depth of field
In facial photography, a depth of field encompassing the tip of the nose to the ear is usually sufficient. Using the other parameters listed in this guide, an aperture or f-stop of f/11 will give a depth of field of about 40 cm.1 This is more than sufficient for just about all circumstances in aesthetic medical photography.
In-depth discussion
In addition to the focussing objective glass, a lens is comprised of 7–13 stacked blades that define the aperture and regulate the amount of light allowed into the camera sensor, like the iris of the eye. The smaller the aperture, the sharper the image will appear over a wider range of distance from the camera, called the depth of field. The aperture diameter is described by the f-stop or f-value of a lens (where ‘f’ is focal length). A smaller aperture has a higher numerical value because the f-value is the denominator of a fraction, so as the number rises, the aperture is smaller. The amount of light captured by a lens is proportional to the area of the aperture or the square of the radius. Each f-stop halves the light entering the lens and is an approximate multiple of √2, that is, 1.4, 2, 2.8, 4, 5.6, 8, 11, 16, 22 and written as a fraction, for example, f/11.

A lens can focus light only at a single point. Even then it does not do this perfectly, so it is more of a focal spot. All the focal points (or spots) plotted gives the focal plane. When a lens is focussed on a focal point where focus is as perfect as possible, everything on the focal plane is also in focus as it is parallel to the camera sensor.
The area in front and behind this focal point is blurred, but a limited area in front and behind will be acceptably sharp for the viewing conditions of the photograph. This is the depth of field. Depth of field is increased with smaller apertures, and f/11 gives us an acceptable depth of field for facial photography. Depth of field is also increased with lenses of shorter focal length and longer camera-to-subject distances. Using the parameters we give in this paper, including f/11, the depth of field is more than adequate for the resolution and size at which aesthetic medical photography is normally presented.
Exposure
Light entering a camera can either be ambient or controlled. The three ways of introducing controlled light are speedlights (inbuilt, on-camera, off camera), strobes, or continuous lighting from light stands or in-camera light emitting diodes (LEDs) such as in smartphones. Speedlights and strobes are usually referred to as flash. Consistent exposure is essential for correct colour and contrast matching between photographs. This can only be achieved by minimising ambient light variations such as daylight and using controlled indirect light from a strobe (mains-powered, intensely bright, fast-recycling flash). At an aperture setting of f/11 (previously chosen for our depth of field), a shutter speed of 1/160 sec will eliminate most ambient light in an indoor setting. It is important to ensure that ambient light does not affect the final image which it will if our photographic area is subject to varying lighting conditions throughout the day. Correct setting of strobe power and bouncing the strobe off ceilings and walls is desirable to illuminate the subject more diffusely. This will prevent overexposure of parts of the subject and prevent harsh shadows on the subject or background. Sensor ISO sensitivity should be set to a minimum, usually 100 on most cameras, with a white balance value closest to 5200 K. This renders dual direct light sources unnecessary, as others have recommended.2,3 The distance of the subject and background from the strobe, the camera, and each other, must not change. A dedicated photographic area is important, without which it is very difficult to replicate conditions.
In-depth discussion
Our brains have evolved to understand the shape of a face (and by proxy expressions, emotions and identity) through one primary light source, the sun. The historical use of dual direct light sources in clinical photography has the undesired effect of both creating unnatural shadows and eliminating other shadows completely, thereby altering the perception of depth in the face.4
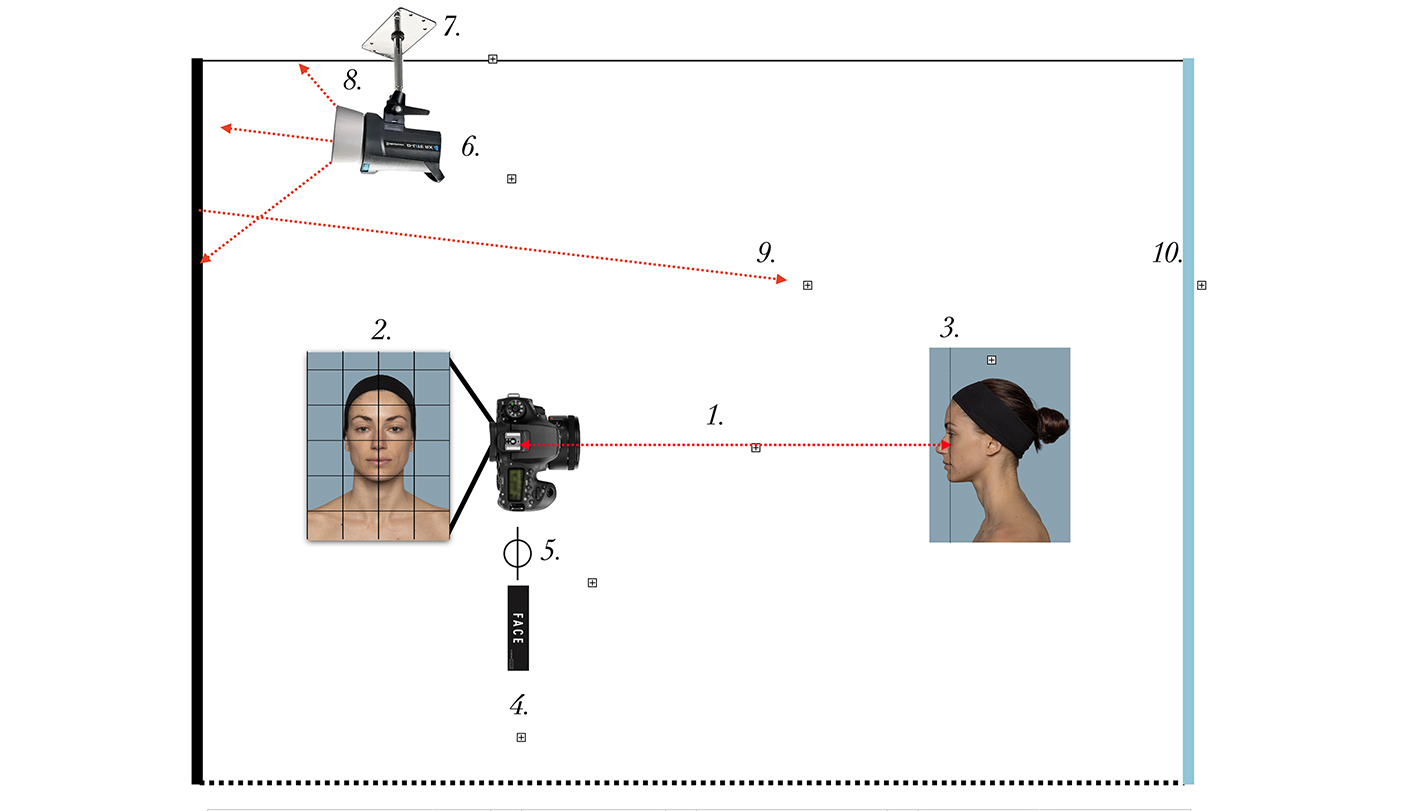
A single, indirect, ceiling mounted strobe is sufficient to illuminate the patient and background as well as free-up vital floor and wall space (required by lighting stands, diffusion boxes and lights). Ideally allow for at least 2.8 m total for the light to travel from the strobe to the patient including the distance it must bounce off walls. Indirect lighting will also eliminate harsh shadows on the background behind the subject. A 90-degree beam angle reflector attached to our flash strobe will concentrate the light beam for maximum bounce.
Whenever we take a photograph with flash, we are really taking two exposures, one with the flash and the other with the ambient light. Light from the flash only enters the camera for the duration of the flash, which is effectively instantaneous for our purposes (T1—transmission—value usually less than 1/800 sec for strobes). Aperture will limit the amount of light from the flash, but shutter speed (exposure time) is not relevant as it is much longer than the T1 value. Shutter speed must be set below the flash sync speed (usually around 1/200 sec) to ensure the shutter is fully open when the flash fires. We set it to 1/160 sec.
On the other hand, ambient light enters the camera for the entire time the aperture is open (exposure time) and so is affected by both aperture and shutter speed. Ambient light can therefore affect the exposure differently throughout the day. At aperture f/11 and shutter speed 1/160, insufficient ambient light enters the camera to affect the photograph. You can see this if the flash fails to fire, as the image will be almost black. At these settings a secondary benefit arises in that a standing patient is effectively frozen and eliminates the need for a tripod.
The relative positions of light source, subject, and background should not change, or matching images will not be possible between capture sessions. As with our camera-to-subject distance (see below), the distance of the light source to the subject and to the background are variables that need to be locked to ensure accurate matching between patient photography sessions. Because illumination varies according to the square of the distance from the light source and what is illuminated, changing the distances between light source, subject and background will lead to inconsistent image matching. Changing the distance between the subject and the background will have the effect of a relative change in the lighting of the background and the subject. Two photos taken under such different conditions will mean the background and the subject exposures will not match the other photograph.

As we are using reflected light we wish to ensure as much reflection as possible for the given watt-seconds we are emitting from the strobe, so the walls should be white. Another reason for using a strobe is to ensure a reliable white balance of the light being emitted. Dedicated strobes will emit between 5200 K and 5500 K white point. In the natural world our visual cortex and eyes constantly adapt the white point of an object to match the light source (typically the sun, tungsten or LED lighting). A camera cannot do this and so needs to be programmed to view white at this temperature. This, as per all our other variables, can be locked.

We want our digital camera sensor sensitivity to be at its lowest setting (usually ISO 100 for most cameras). Increasing sensor sensitivity (‘speed’) or ISO amplifies the light received by the sensor. While this may be very useful in low light conditions, it is not in a controlled light situation. If we set strobe power to saturate the sensor with light, no in-camera amplification of the signal is necessary, and we get the cleanest image with the least digital noise. On-camera speedlights have insufficient power in the scenario outlined and thus should be avoided. A single 400 W strobe is usually sufficient but this depends on the size of the photographic area. It must be synchronised to the camera shutter and pointed away from the subject to utilise bounce off walls and avoid direct light. Flash power should be adjusted to give the brightest image without any overexposure and therefore loss of highlight detail.
Normally the triad of aperture, shutter speed and sensitivity determine exposure when subjects are lit by ambient light. With strobe flash photography as outlined here, the combination of aperture, flash power and sensitivity determines exposure, the shutter speed being set to eliminate ambient light and freeze the subject.
Perspective
The perspective of the image is critical in matching two different photographs. Camera-to-subject distance (CSD) must be the same in order to match two images (as must point of view). If this is not done it will change the ratios of objects nearer and farther from the camera making matching impossible.
Depending on the photographic area available to you, we recommend setting a CSD of between 1.2 and 3 m (4 and 10 ft). This distance must not change. Choose a distance and stick to it. A fixed focal length lens will ensure no variation in zoom ratios which, although won’t affect the final photo in terms of matching, will require more editing to match framing. We recommend a 50 mm prime lens with an APS-C (crop) sensor as it balances cost, weight, distortion and optical quality. The camera should be held in a vertical position (portrait mode) for all photographs. This makes maximum use of the area of the camera sensor. This portrait mode does not lead to wasteful negative space around the face that a horizontal camera orientation would capture. It is important to note that magnification is not a property of the lens, it is the distance from subject to lens that matters. This is misunderstood in many commentaries (see ‘In-depth discussion’).
In-depth discussion
Perspective is the fact that objects closer to us look larger and objects farther away look smaller. Perspective (magnification) distortion or exaggerated perspective occurs when we are too close (extension or wide-angle distortion) or too far (compression or long-lens or telephoto distortion) from the subject. These changes are caused by the distance, not the lens. The lens and the crop factor of the sensor are irrelevant for perspective distortion. A photograph taken of a subject from the same distance will have the same perspective no matter what lens or sensor is used.
This area has been largely misunderstood in the medical photography literature as a lens issue.2 Even excellent articles on standardisation have failed to appreciate perspective when looking at standardising photographs,5–8 but the importance of distance has been recognised in others.9–11 To understand this we must look at history.12 In the days of film, and even early digital cameras,13,14 cropping images was a difficult undertaking, as opposed to today’s digital sensors and editing programs. The photographer attempted to frame the subject in a consistent manner so as the photograph required no cropping to match framing between photographic sessions.15 But attempting to consistently frame photographs with a variable zoom lens or with different cameras and different lenses will lead to perspective changes. Because most digital cameras these days have such a high resolution compared to years ago, moderate cropping still allows a high-quality image sufficient for screen or print. The same perspective can be achieved using any camera including smartphones, tablets and basic cameras if taken from the same distance. However, with lesser cameras and smartphones, all other parameters are different and inferior—image quality, resolving detail, depth of field and colour rendition. Smartphones are useful outside the clinic but accurate ‘before and after’ representations require standardised conditions.16
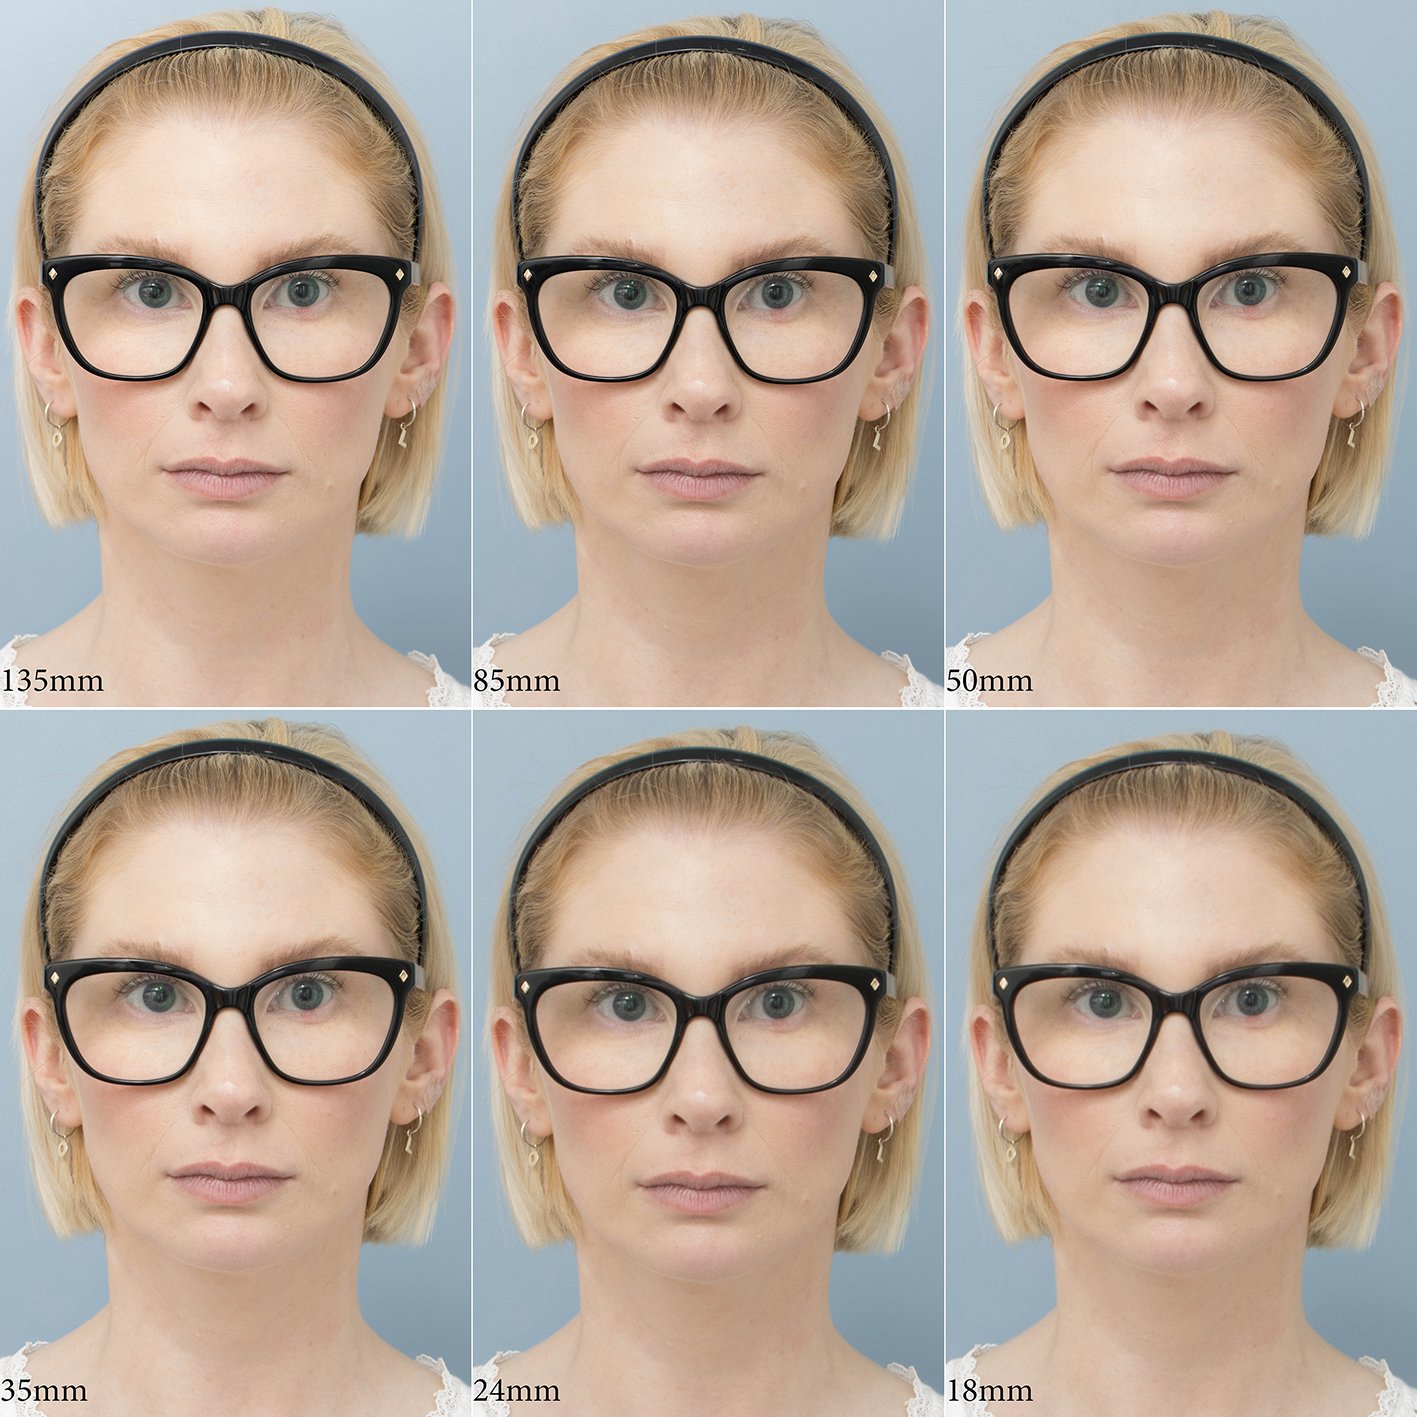
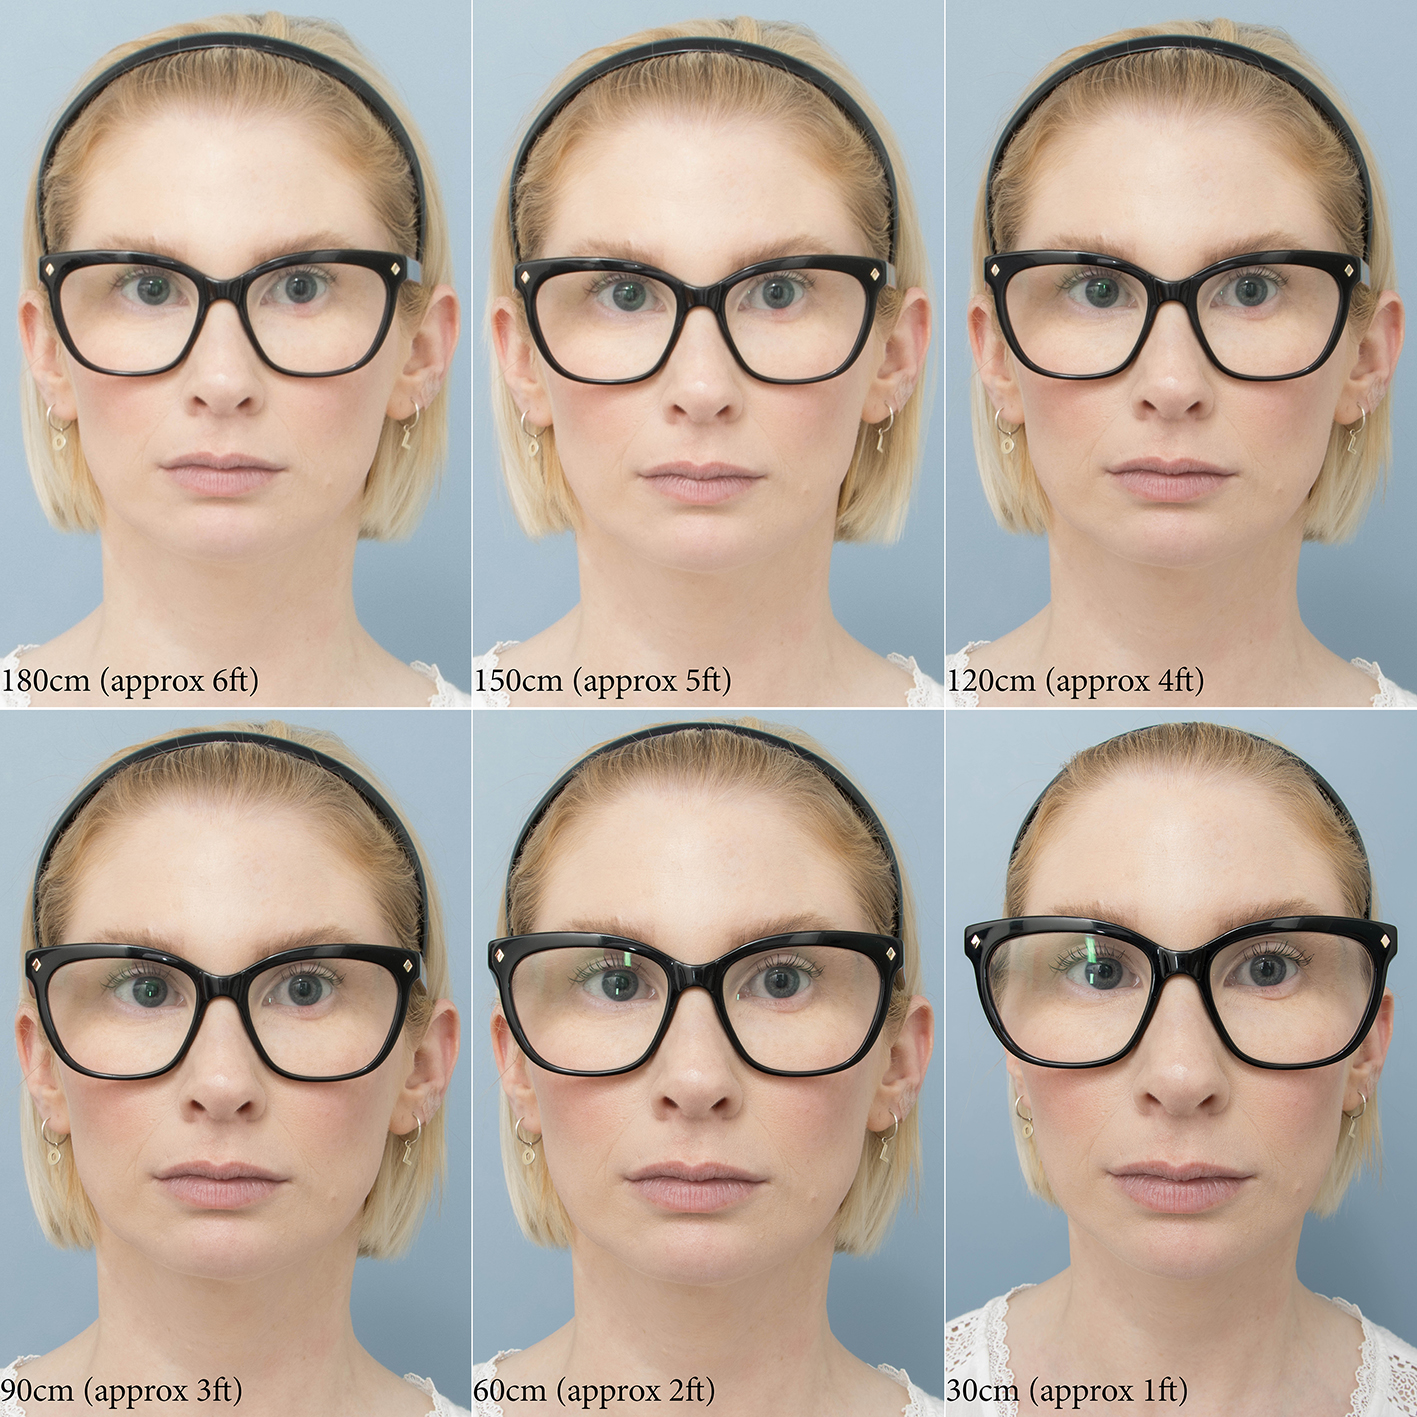
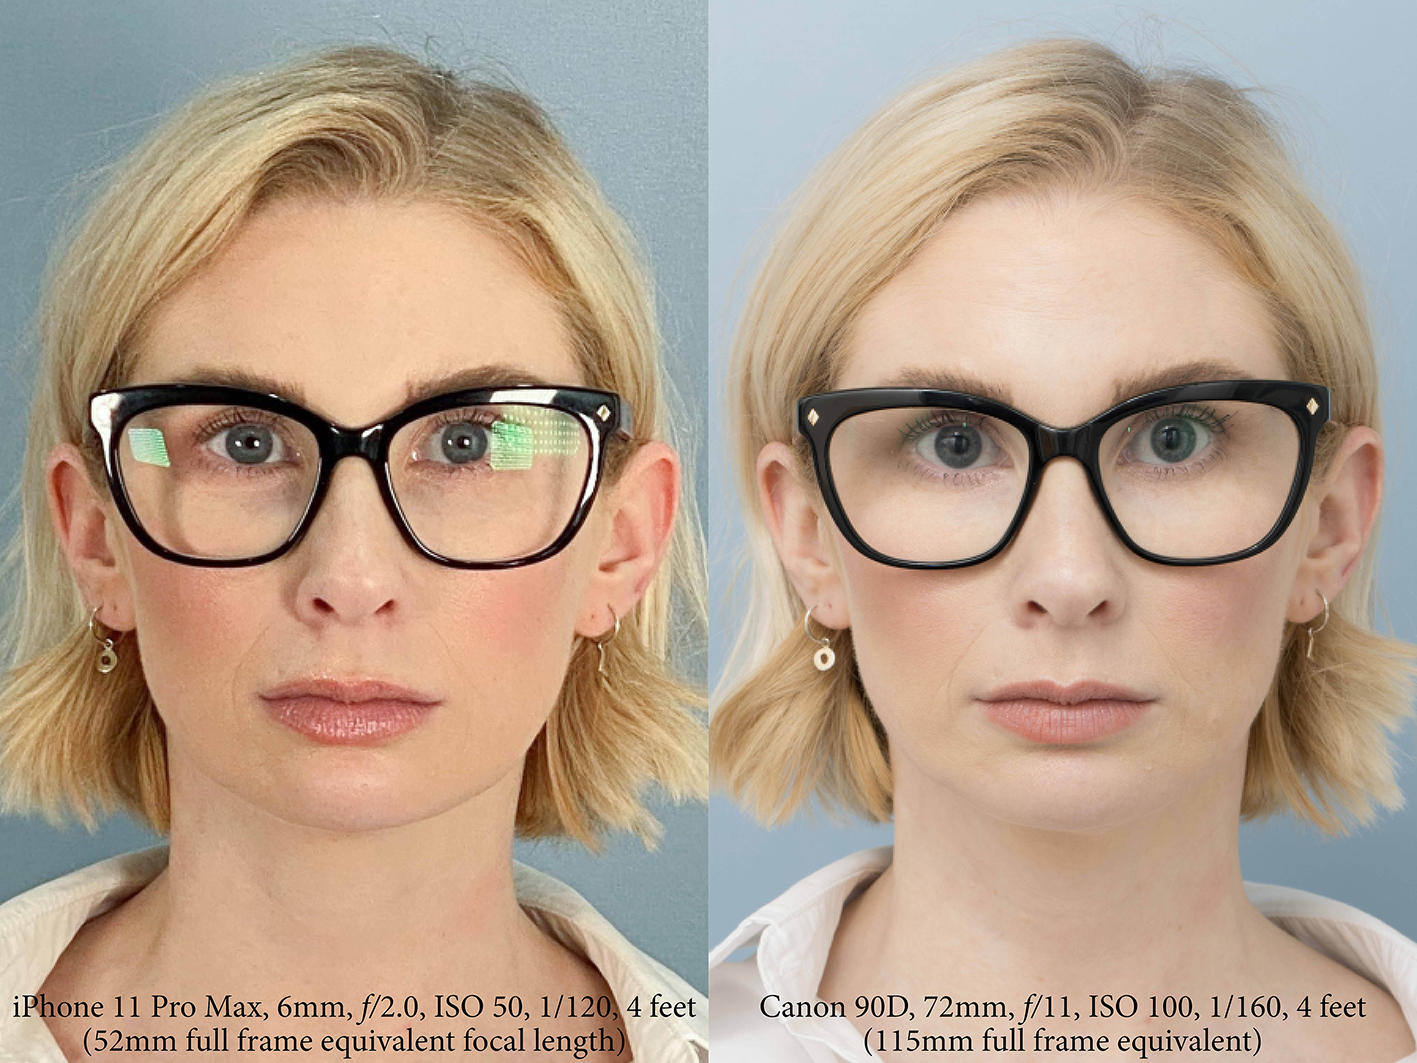
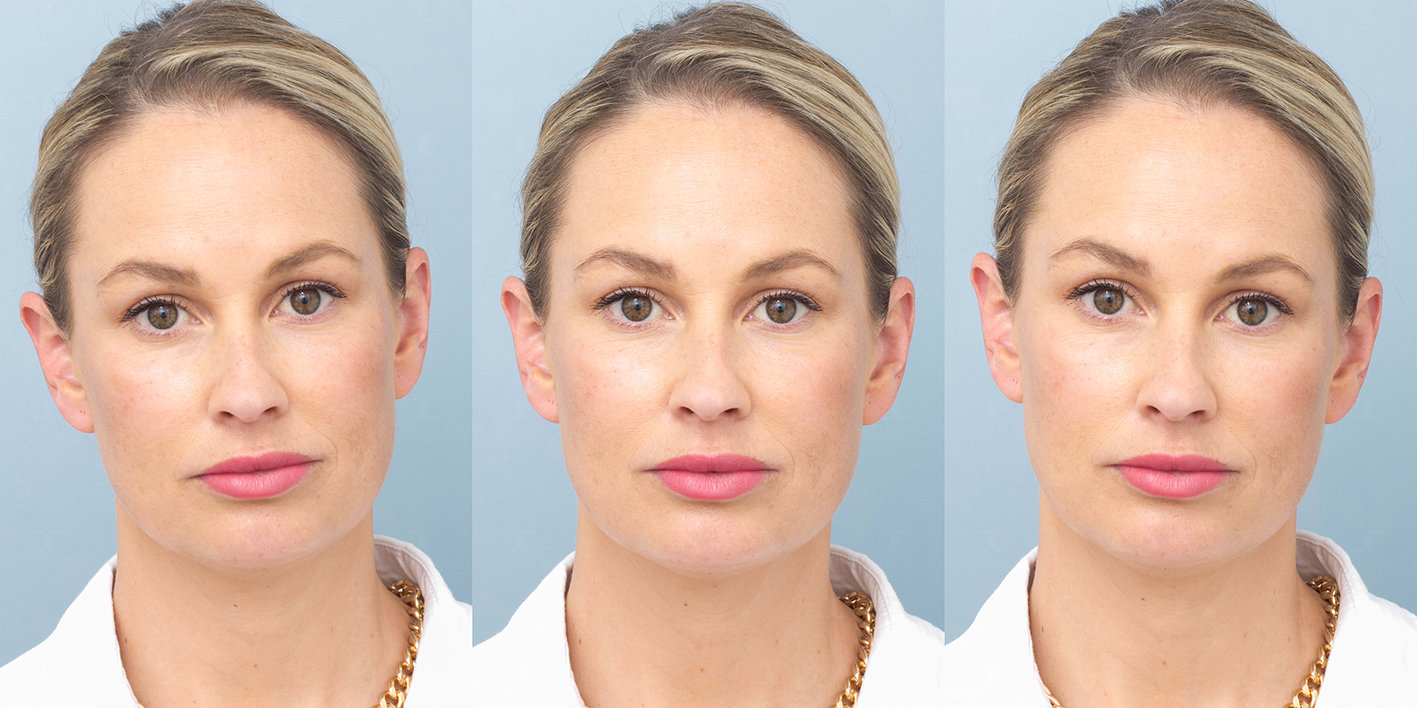
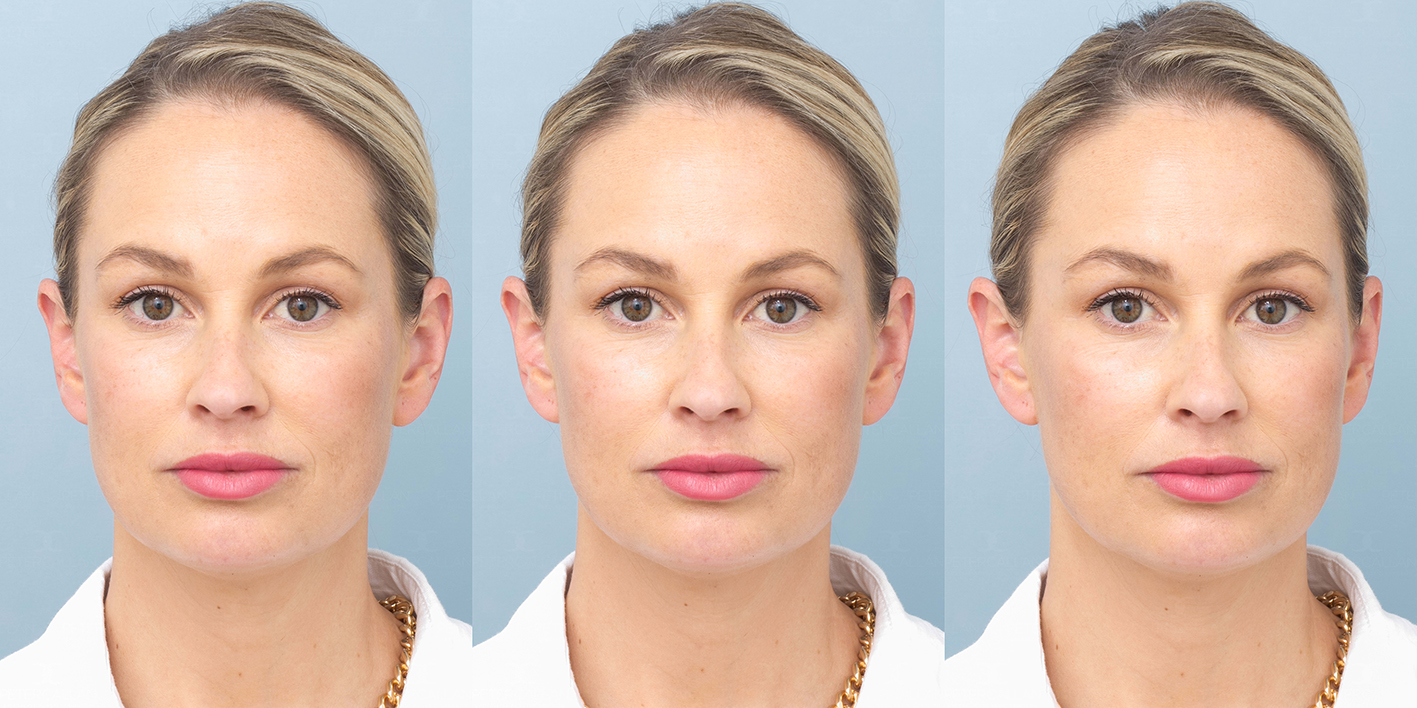
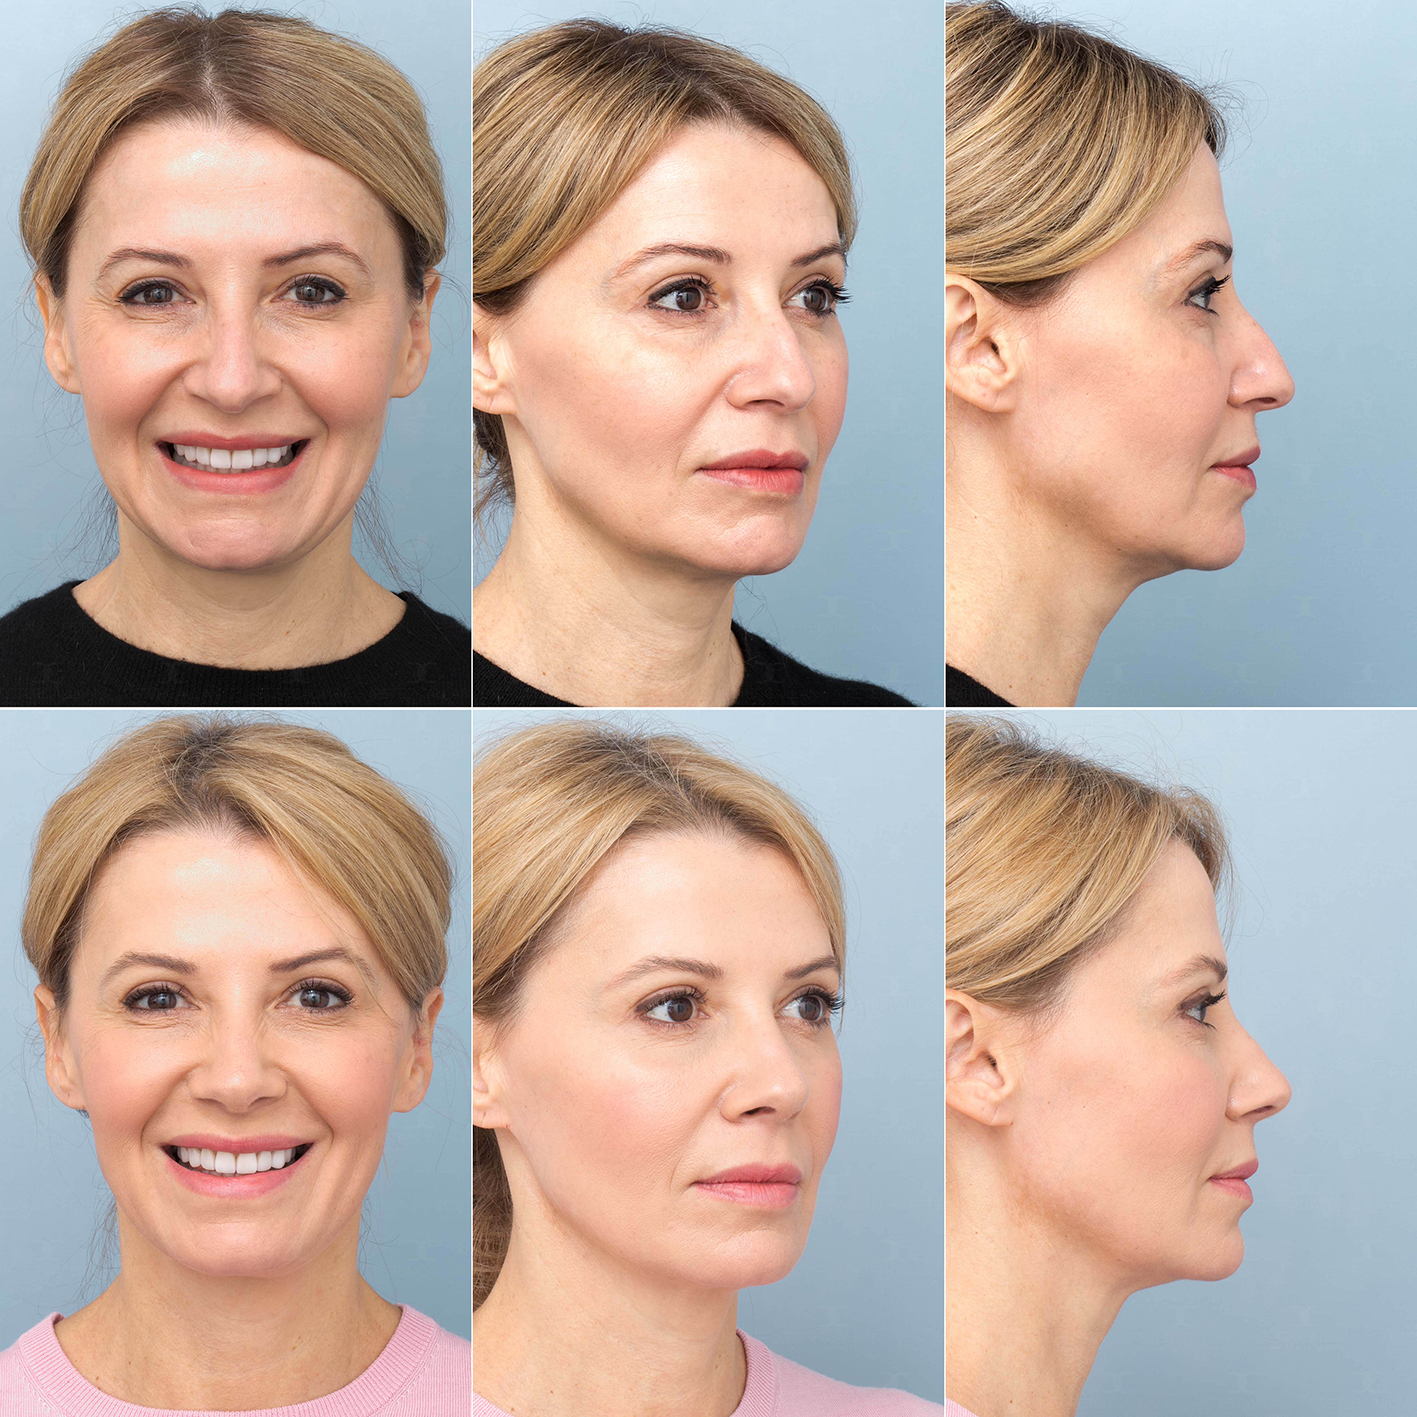
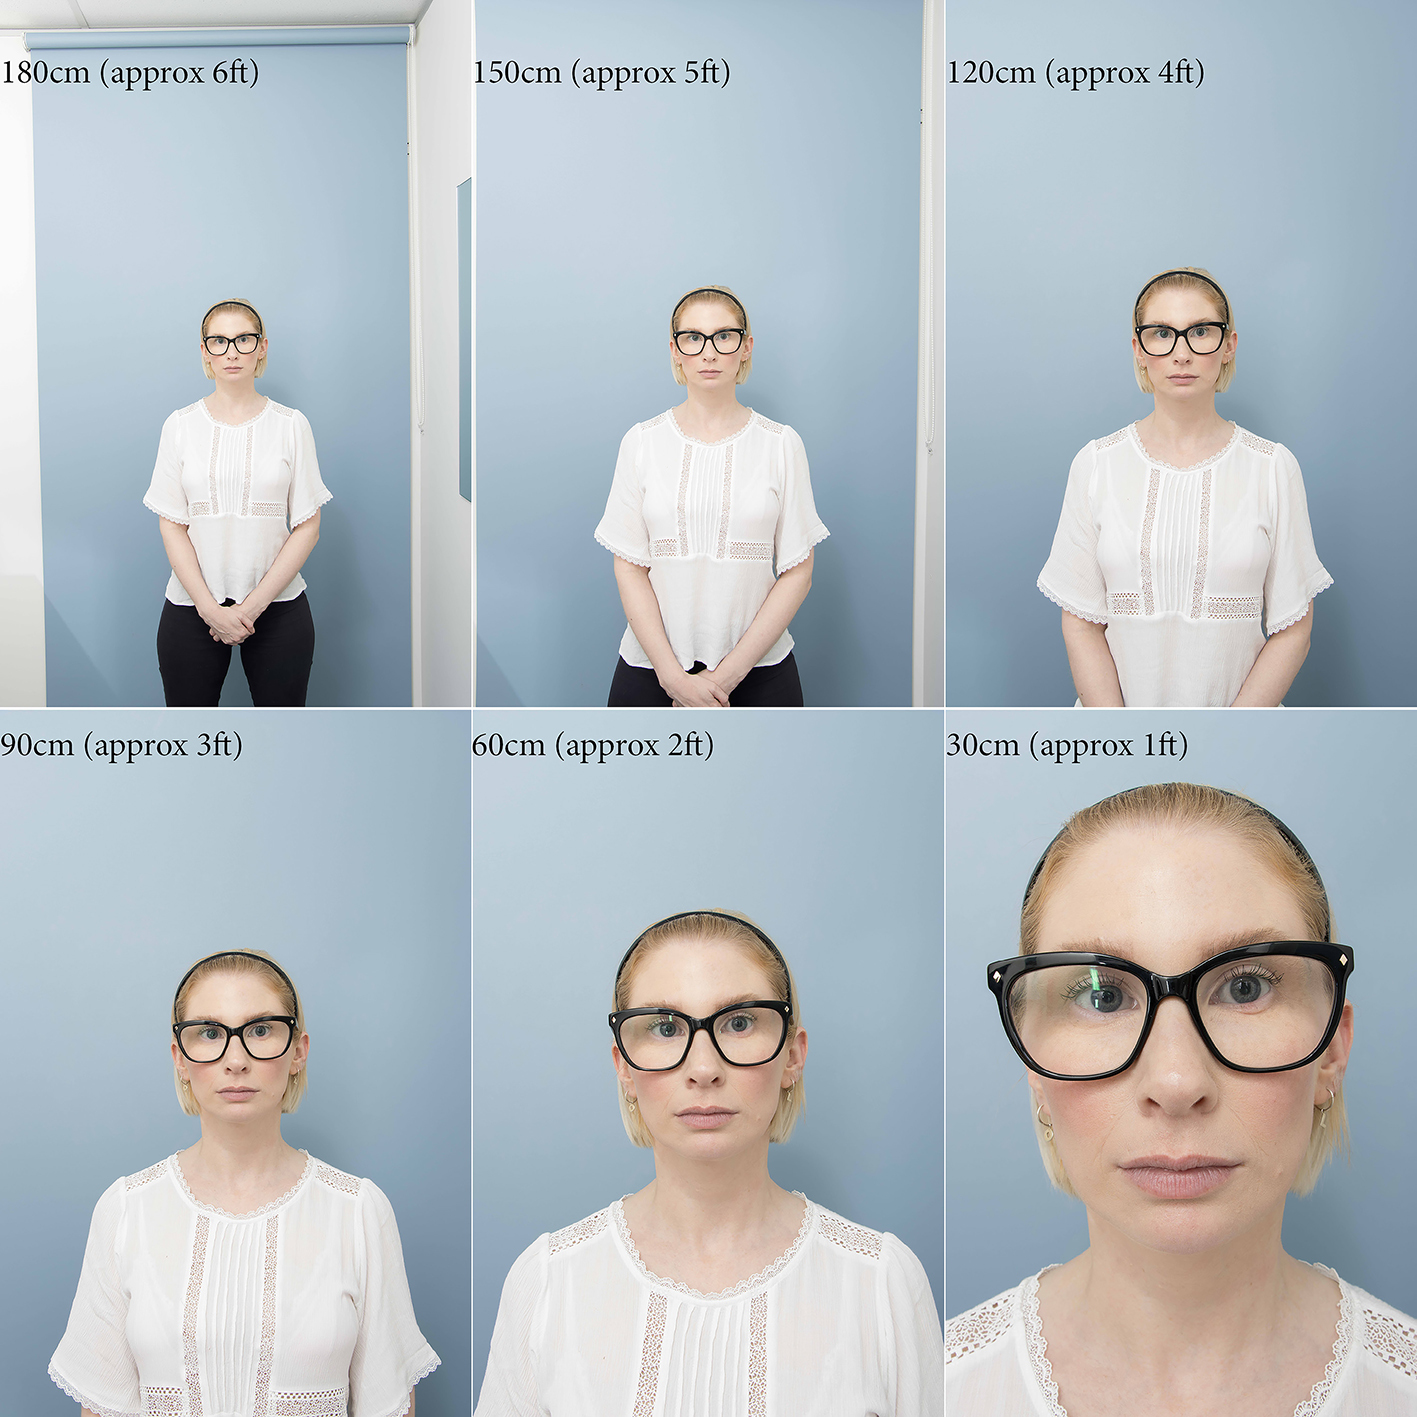
When photographing a face, the nose is closer to the camera than the eyes and ears. Because of the angle of view with short focal length lenses, photographing a face so as it fills the frame requires the photographer to stand very close to the subject, whereas with a longer focal length lens one must stand farther back. Standing close to the subject exaggerates perspective (often mistakenly called lens distortion in many commentaries), making the nose look big and the ears small (or not even seen). Perspective distortion is noticeable if the distance between units on a ruler at the nose tip level is more than 5 per cent larger than the distance between units on a ruler at the outer canthus level.17
.jpg)
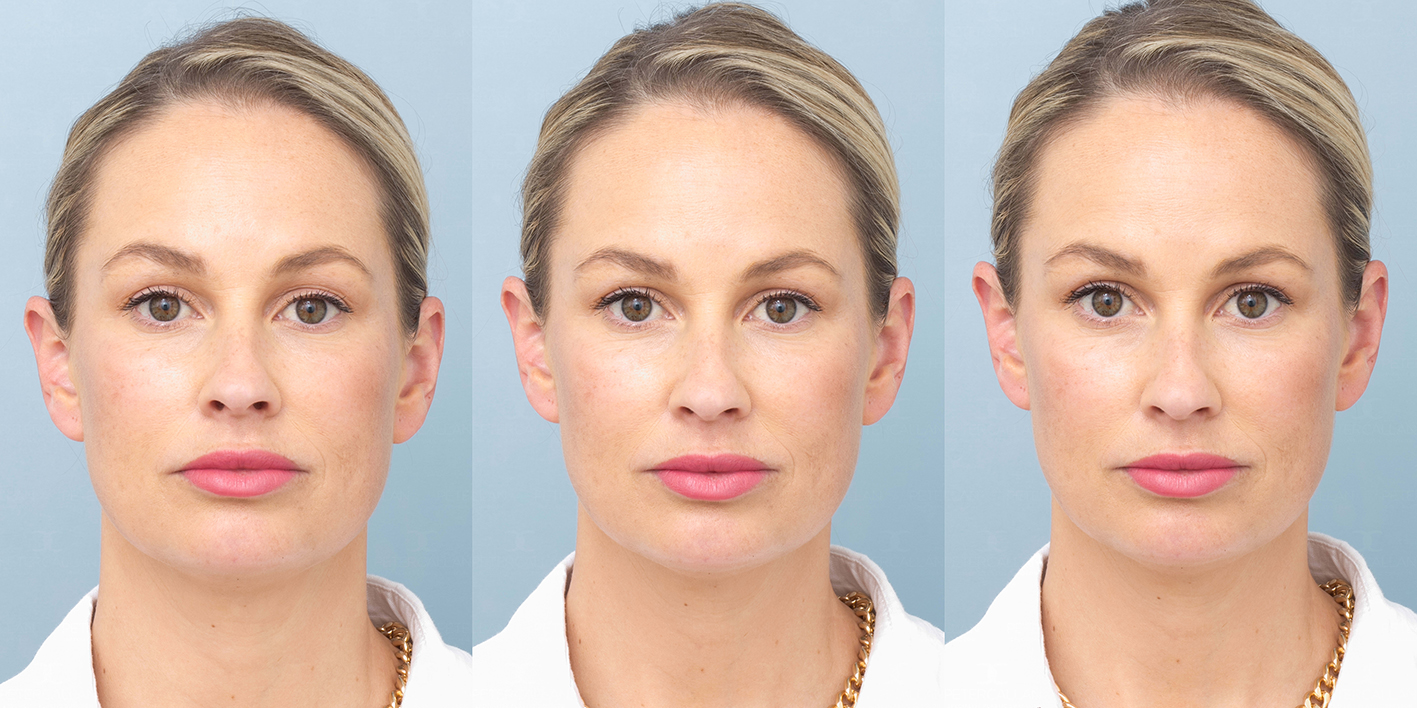
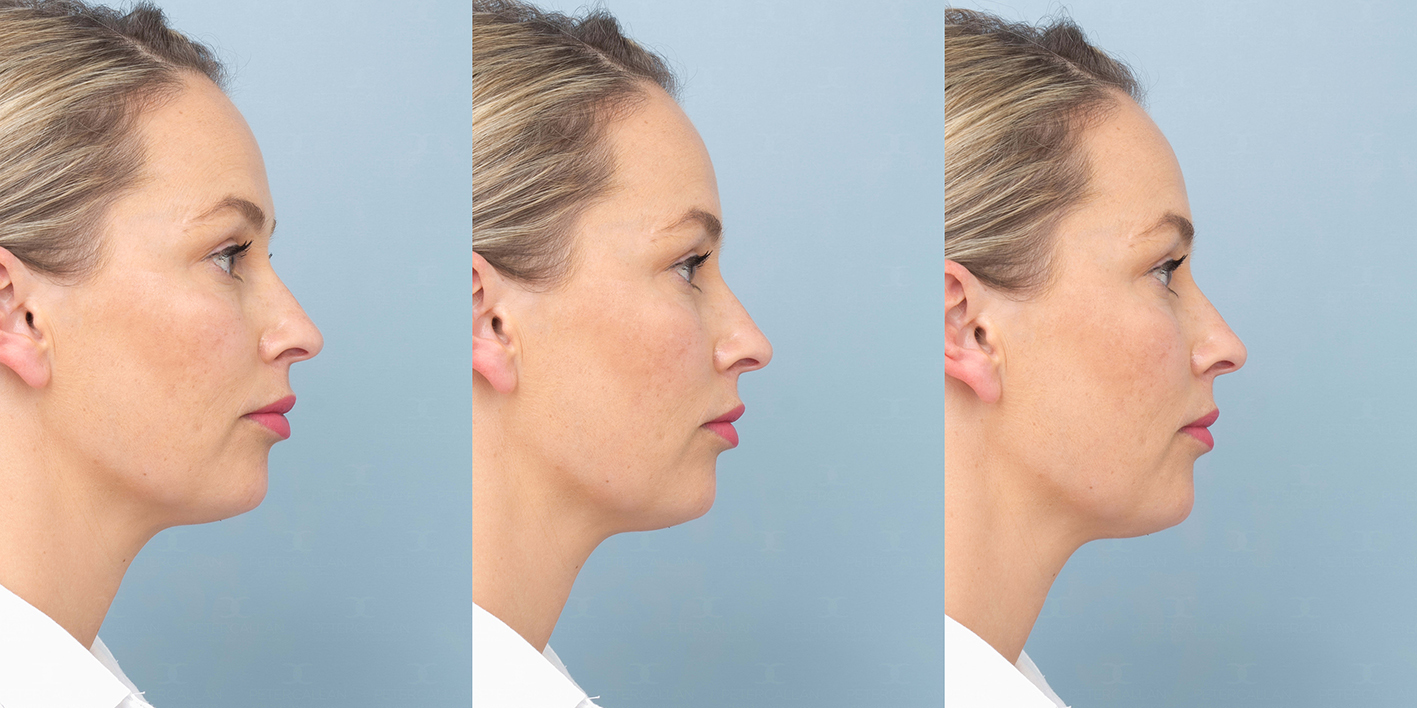
This occurs at 1 m (3 ft). We recommend being at least 1.2 m (4 ft) or preferably 1.5 m (5 ft) where this magnification distortion is less than 3.5 per cent. Once CSD gets beyond 1 m (3 ft) the face looks normal, and past about 3 m (10 ft) the face starts to look flatter and more compressed, another less troubling kind of exaggerated perspective often mistakenly termed lens compression. If you take a photograph with a 135 mm lens from 1.5 m (5 ft) away or with a 24 mm lens from 1.5 m (5 ft) away, and then crop the images to match framing (that is, the same amount of face fills the frame), the photographs are identical, as is perspective.
_but_with_decreasing_focal_lengths.jpg)
_cropped_to_match_framing.jpg)
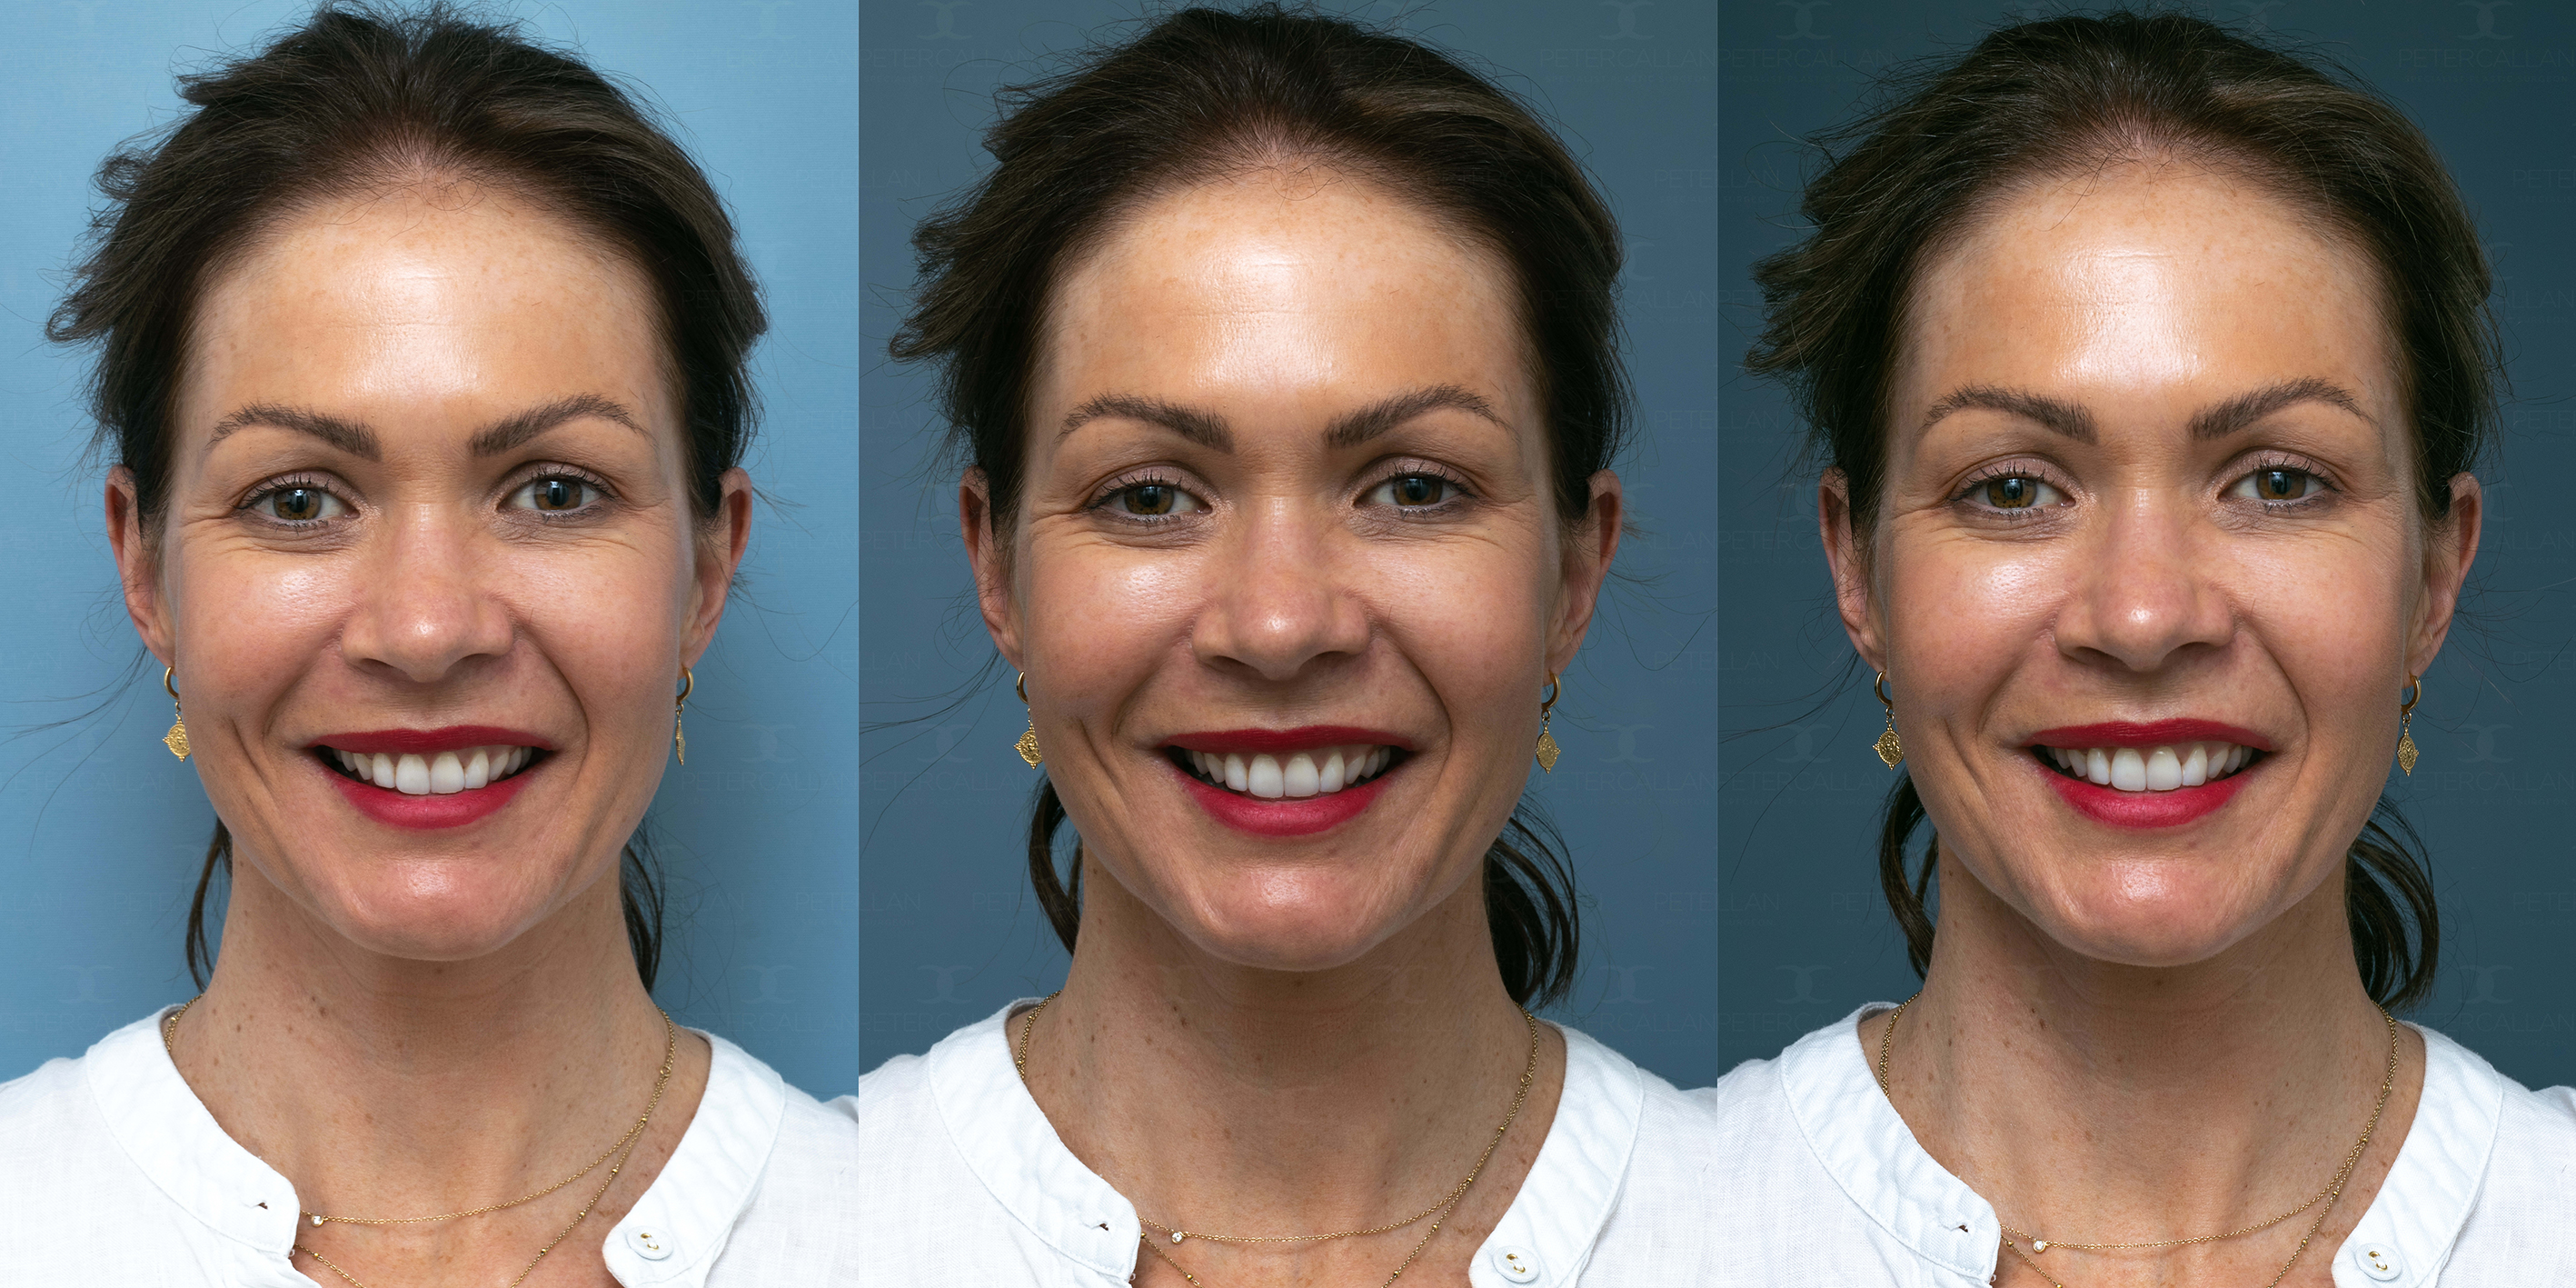
The reason people often perceive selfie images differently is that the image is taken at less than a metre, where noses and lips look larger.18,19
_cropped_to_match_framing.jpg)
As mentioned above, if a smartphone image and DSLR image are taken from the same distance, perspective can be matched.

It is best to choose a CSD and stick with it, because photographs cannot be matched unless they are taken from the same distance. More than 1.2 m (4 ft) and less than 3 m (10 ft) is the recommended range. It just must be the same CSD each time. Work out a comfortable distance to stand between 1.2 and 3 m (4 and 10 ft) as your photographic area and camera demand and mark it.
So now we know that a lens does not change perspective, we should also mention the size of the sensor. Full frame cameras have 35 mm sensors (the same as 35 mm film—36 mm wide x 24 mm high), but these cameras are expensive and unnecessarily larger. Most semi-professional cameras these days have compact sensors, which essentially crop the image that would be seen from a full frame sensor. This gives an effective change in focal length of the lens equivalent to zooming. The ratio is × 1.5 for Nikon, Pentax, Sony, Fuji, and × 1.6 for Canon, but there are other sensor sizes. So, a Canon 50 mm lens on an APS-C sensor camera gives an effective focal length of 80 mm. Note that the lens focal length itself doesn’t change, and the image is the same as that taken with an 50 mm lens on a full frame sensor if standing at the same distance, but the edges are chopped off because there is no sensor there to capture that part of the image. Because newer cameras have more megapixels, a Canon full frame sensor with an 80 mm lens a few years ago may take the same image as a 50 mm lens on a Canon compact sensor today (with Nikon and most others it would be 75 mm on a full frame gives the same as 50 mm on a compact sensor). For practical purposes 24 megapixels strikes a balance between detail, data transmission speed and file size.
With most lenses, resolution falls off towards the edges of the frame. Therefore, a border around the subject is a good idea. With a compact sensor often the peripheral (lower resolution) areas of the lens are not used anyway, so the border can be less. Optical resolution typically suffers at wider apertures, however f/11 as previous described is an optimal value with minimal image degradation.
To clarify from a visual aspect, cropping images in post-production (with editing software) is the same as zooming in or using a longer focal length lens. Cropping, optical zoom and digital zoom are for the purposes of the medical photographer identical in their effect on an image. Cropping and digital zoom only use part of the image and so the pixel count will be less than using the full sensor as in optical zoom. This now doesn’t matter as much as it did due to the high megapixel count on most modern cameras if only a moderate crop is contemplated, and the viewing conditions of the photograph have sufficient pixels for good resolution.
Finally for completeness, a word on optical distortion. Optical distortion is a property of the lens and different to exaggerated perspective. Optical distortion is when a lens produces curved lines where straight lines should be. This is termed pincushion or barrel distortion and will not be discussed here. Using the techniques described will keep these problems to a minimum, especially maintaining a constant CSD of between 1.2 and 3 m (4 and 10 ft) and a border around the subject.
Point of view
Point of view is possibly the hardest part of the photograph to perform consistently, and the one where the photographer has control. Once the variables previously discussed (depth of field, exposure and perspective) are standardised and automated, the photographer can expend all their efforts on good photographic composition.
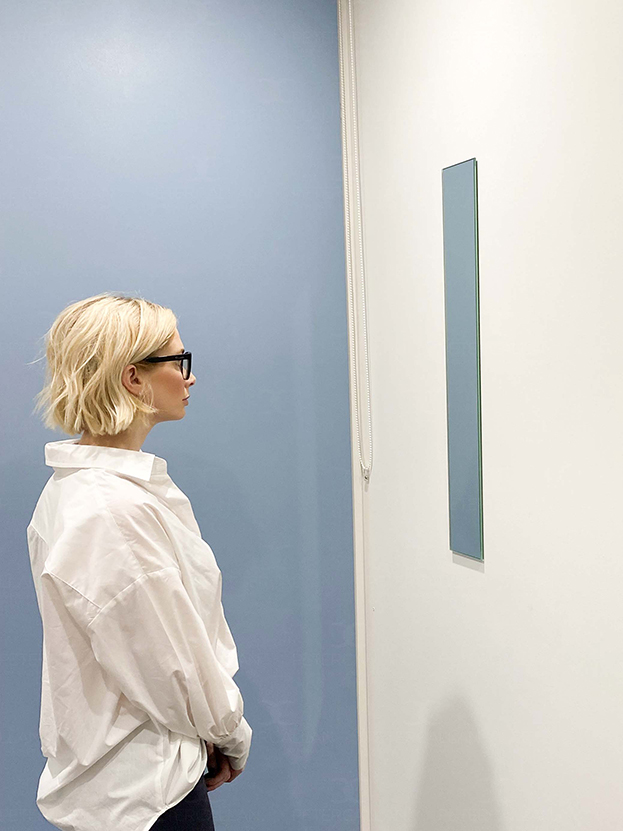
We have established that the subject should stand in the same position and be the same distance from the background. Spots on the ground or wall for both patient and photographer solve the distance issues. Various expressions, head positions and movement around the three axes need to be standardised. We have found that mirrors on the walls at various angles help considerably (0°, 35°–45°, 90°). Of all the things the photographer must control, head positions and expression are the most challenging. We have found that 45 degrees is too much of an angle, assuming looking at the camera is 0 degrees. Somewhere between 35 and 40 degrees is preferable if it can be replicated between sessions.
We suggest the patient look at themselves in a mirror in a comfortable position that is their normal head angle.

The Frankfort plane20 is a good yardstick but may be difficult to use in some subjects because the external auditory meati are only seen in oblique and lateral views, and the infraorbital margin is only visible in some individuals. Other lines such as the PSA line as suggested by Rhee,10 and the NETWORK line as suggested by Prantl,9 which relate the levels of the eye and ear, are probably more useful. These landmarks can be seen and easily identified in all views and are probably preferred. In either case the ears must be exposed completely to ensure correct head tilt, and the same gridline on the camera can be used each time a photograph is taken to align the position.
The camera lens barrel should be parallel to the floor and walls and at the level of the subject’s eyes, with the focal plane being at the eyes when the subject looks straight ahead or obliquely. With side views the side of the cheek is easiest to use for the focal plane. Depth of field extends in front of and behind the focal plane. Relaxed and expressive views need to be consistent. Having the preoperative shots available for reference is helpful.
A Chroma Key background is usually preferable. The choice of colour is personal but using a colour not found normally in the patient’s skin gives maximum flexibility. Wedgewood blue is a common choice.
In-depth discussion
The focal point is that part of the subject on which you are focussing. The point of view is the relative position from which that focal point is seen. The focal plane is a plane of focus that runs through the focal point and is parallel to the sensor of the camera. For our purposes it is a plane, although may have a very slight curvature. The angle of view is the angle the sensor sees and is dependent on the refractory power of the lens.
From the front view, the eyes are at the correct level for eyelid comparison, and also for the nose as it is seen by others who are looking at the subject’s eyes. It is not unreasonable to use another point if so desired, but the patients gaze will not be looking straight along the barrel of the lens, more likely looking slightly down if the focal point is the nose tip, although this is barely noticeable from 1.2 m (4 ft) or more which is the minimum CSD we are using. The other advantage of using the eyes relates to depth of field, which the viewer will perceive to be in focus from at least the tip of the nose to the ears. The surface of the eyeball also does not change position with surgery (as a rule). Depth of field is roughly half in front and half behind the focal point, which works well if the eyes are used. The tip of the nose is perhaps too far forward to use as a focal point but is unlikely to be a problem. Eye detection autofocus in many newer cameras can be a useful tool.
Photographs can never be compared if the patients head is not in the same position in x, y and z axes. So, head roll (x or front axis), tilt or pitch (y or side axis) and pan or yaw (z or top axis) must be avoided.


This is because everything relates to everything else (for example, neck, chin, sternum and clavicles), and changes cannot be assessed unless the same resting position is used. For example, if the eyes are looking at the camera, eyelid tarsal platform show is greater when the head is tilted back, scleral show is greater when the head is tilted down. Tilting the head also affects the angle of the neck and show of the nostril.21 Any deviation in subject x, y, or z axes cannot be corrected by cropping because the eyes change position and the relationships of other anatomical features change, such as neck to chest and shoulders. As for the camera, the lens barrel should be parallel to the floor (y), parallel to the wall (z), which should also mean it is perpendicular to the focal plane at the focal point if the subject is also square. Camera x axis deviations can be corrected with cropping (not so y and z).
The slightest smile, frown or tension will change the positions of facial volume, lip position, brow position and resting eyelid level. Relaxation and animation shots must be equivalent. Hair and makeup can affect comparison shots, but control over this can be limited. If it doesn’t detract or deceive in comparison, it is usually the least troublesome to deal with. Skin reflectivity can vary from day to day and patient to patient. This can be reduced by cleaning, colour correcting cream and powder, if needed in certain circumstances. It goes without saying that if dermal changes are being assessed the skin preparation must be equivalent between sessions.
Other factors
Always shoot in RAW mode to allow maximum flexibility in processing the image including white balance adjustment if necessary. Two images can still be slightly different when shot under identical conditions with the same parameters. Shooting in RAW gives you the highest quality image with the greatest levels of brightness, ability to correct for exposure and white balance problems, as well as non-destructive editing and export colour space options. For these reasons JPG capture format should be avoided, as these parameters are ‘baked-in’ to the photograph and cannot be altered.
Memory and camera speed are no longer restrictions that would hold one back from shooting in RAW, and most programs can read them. An additional advantage is all editing programs have programmed pre-sets for the RAW file that lock colour, optical distortions, white balance and RGB values. Once this pre-set is created it is another variable that is standardised. This, however, is beyond the scope of this article and will discussed in another paper.
Results
We have found that using the parameters discussed allows us to take well matched photographs.

Consent to publish
Patients/guardians have given informed consent to the publication of images and/or data.
Disclosure
Woodrow Wilson is director of Clinical Imaging Australia.
Financial declaration
The authors received no financial support for the research, authorship or publication of this article.